Last updated on 25th November, 2025 at 12:13 am
Heads Up: For the sake of transparency, this post might contain affiliate links. If a sale is made, I will receive a small commission (at no additional charge for you), which helps keep the lights on and helps feed my cats. Please read our disclosure policy for more information.
Seriously, how to sell on Redbubble?
Have that question in mind? For your information, this is the most frequently searched question on Google regarding Redbubble.
The fact that so many people want more information about Redbubble suggests that a significant number of individuals are interested in this website.
Mainly, how to sell and make money on Redbubble.
If you are here to find more information on how to sell on Redbubble and make money on Redbubble, this ultimate guide is definitely for you.
Not enough time to read it at the moment? Feel free to pin this and get back to it whenever you are available.

In this ultimate step-by-step guide, I’ll explain in-depth:
- What is Redbubble?
- How does Redbubble work?
- How to sell on Redbubble?
- Tips on how to make your first sale.
- Extra Redbubble selling tips.
- A valuable lesson learned (mistakes to avoid).
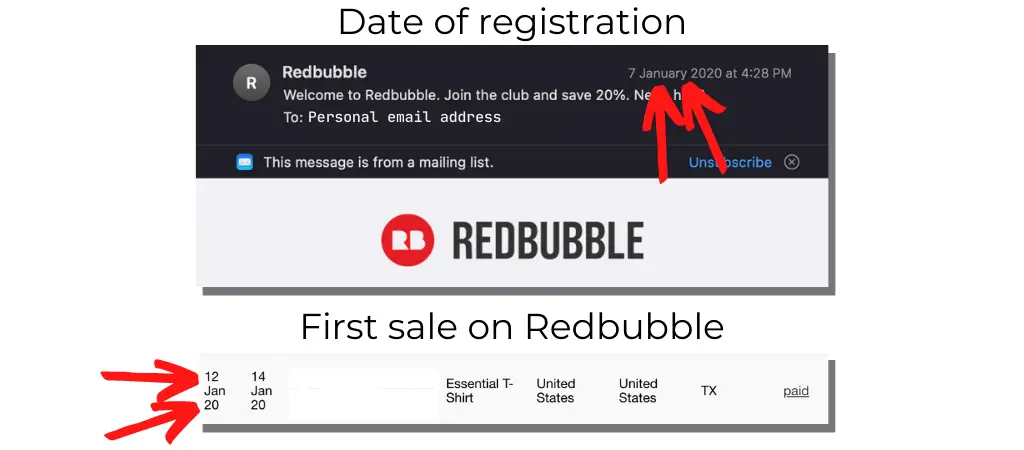
All the tips & tricks that I’m about to share in this post are what I did to achieve my first sales (refer to the screenshot below).
To be honest, I don’t mean to brag here. It is only natural for me to share my experience along the way.
And you may ask, why do I need to share this? Simply because I understand the struggle to make money online.
As a matter of fact, my first successful online earnings came from Redbubble.
In addition to that, I would be delighted to make sure that you, too, have the chance to make your first sale on Redbubble right away.
You might find these interesting too:
Without further ado, let’s dive in now!
What Is RedBubble?
Redbubble is a global online marketplace for Print-On-Demand (POD) products made from user-submitted artwork.
Established in 2006, Redbubble is located in Melbourne, Australia.
As a large company that operates on the Internet, the company sells its members’ artwork for decoration on a variety of products.
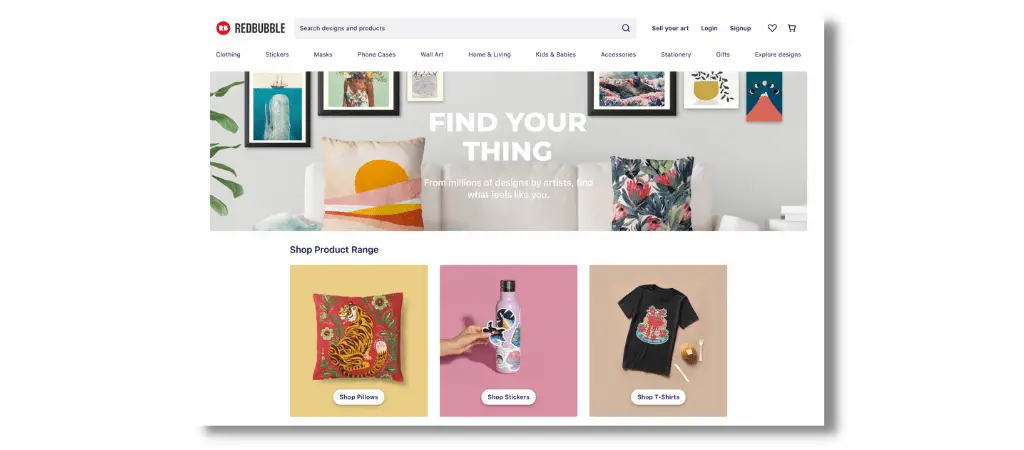
Their line of products includes T-shirts, stickers, hoodies, shower curtains, mugs, backpacks, cushions, duvet covers, leggings, skirts, and many more.
Redbubble is a popular website with many visitors and customers.
This website ranks highly on Google, giving you a higher chance of making sales.
Sounds good? Now let’s move on…
How Does Redbubble Work?
You upload your artwork – a customer likes your design and decides to purchase it – Redbubble will print the artwork and ship the product to the customers, and you get paid.
In a nutshell, here’s how it works.
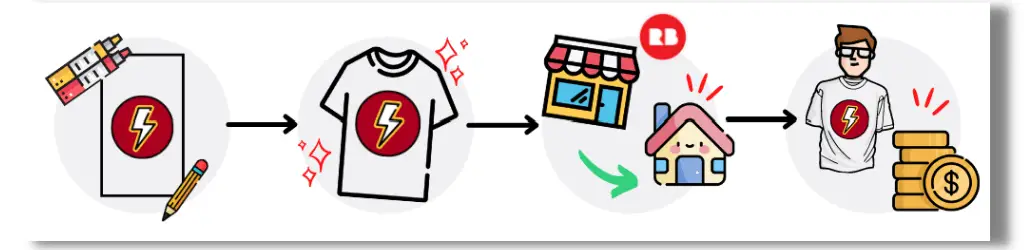
- Sign up for a free account and start uploading your wonderful artwork to your shop.
- Customers purchase products featuring your designs that they love.
- Redbubble produces products upon order, and they ship them worldwide.
- The customer gets an awesome product; you get paid.
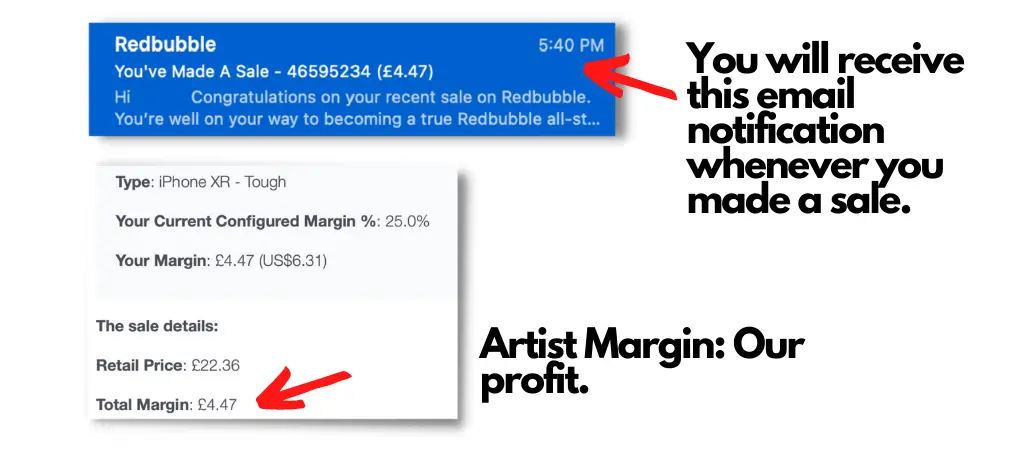
While I am writing this section, I’ve made a sale! I’ll share how it looks like and I hope it will encourage you to start selling on Redbubble too!
As a seller, you should get familiar with how payments and pricing work on Redbubble Marketplace.
Basically, this is how it works.
I’ll break it down as below.
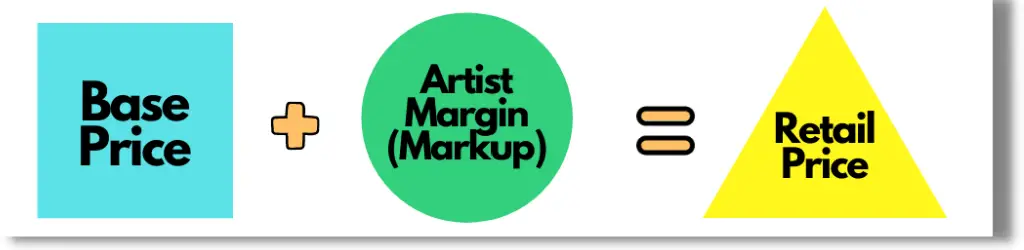
Base Price
This price covers Redbubble’s service fee as well as manufacturing costs.
This allows Redbubble to take advantage of local production, material costs, and taxes depending upon the artist’s country, production, and delivery countries.
Artist Margin (Markup)
Artist Margin (Markup) is a value that depicts how much profit you make on a sale.
The markup represents a percentage of the base price, while the margin represents the actual amount.
By default, the markup is set to 20%. But you can change that amount (raise or lower) at any time on the Account Details page under Product Pricing.
Retail Price
Retail price is the price you see on Redbubble for each item, which is determined by the base price and the artist’s margin.
Refer to the example below.
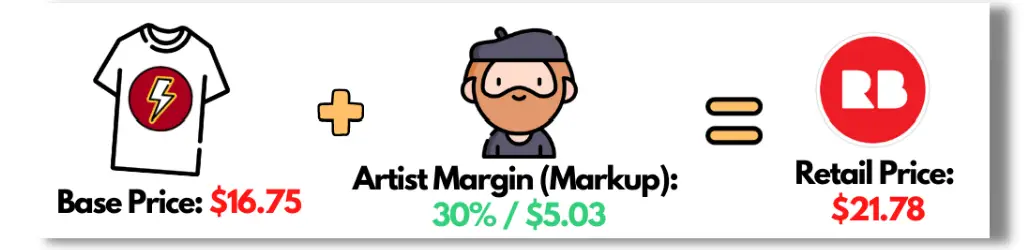
Classic T-shirts that will be shipped to the US have a base price of $16.75.
As for this example, I set the Artist Margin (Markup) as 30%, which gives me a profit of $5.03.
That makes the Retail Price: $21.78. This is the price that you’ll see across the website.
When will I get paid?
Payments are made to Redbubble artists who have earned $20/20€/£20 or more during the monthly payment cycle, which begins on the 15th of each month.
If an Artist’s earnings have not reached $20/20€/£20, earnings will accumulate until they reach the threshold and will be paid on the following payment cycle.
Important: You must complete the payment information (check if you confirmed your email address on PayPal and get it verified).
Now that you understand how Redbubble works, let’s move on to the most important part, which is…
How to sell on Redbubble?
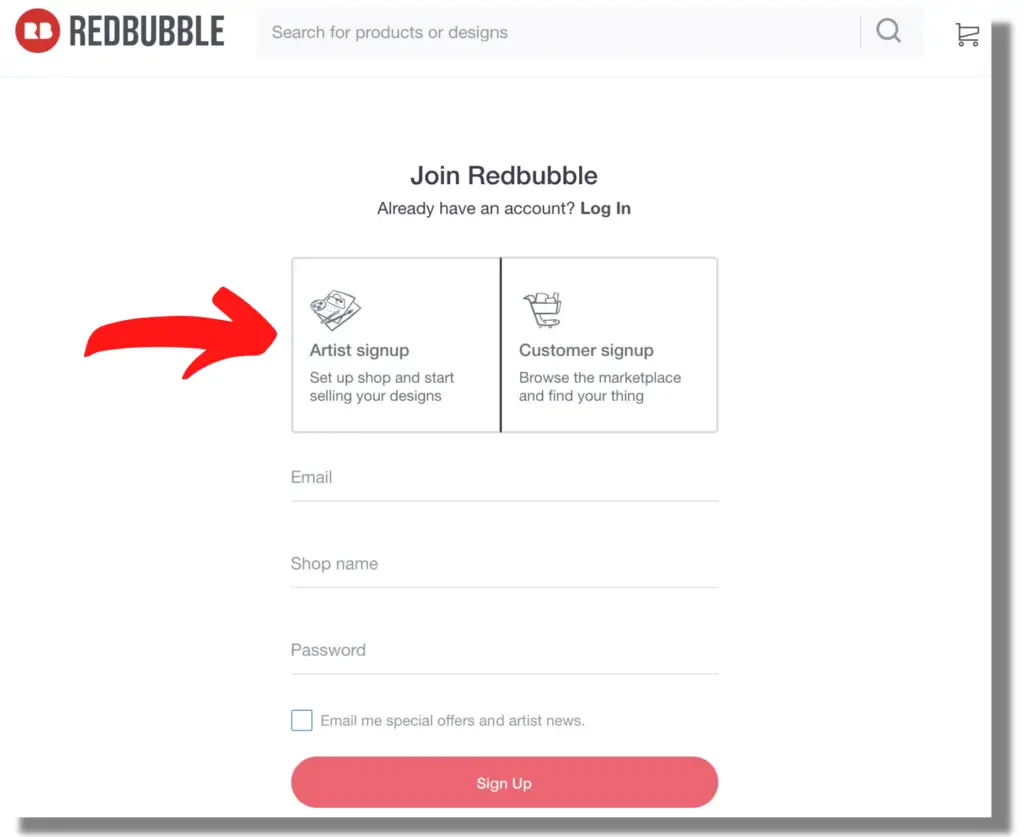
1. Create New Account (Artist Signup)
Before you can start selling, first you have to create your seller account (artist signup). It’s free, and the registration process is pretty straightforward.
As soon as you have your account, you’ll be directed to the Dashboard below:
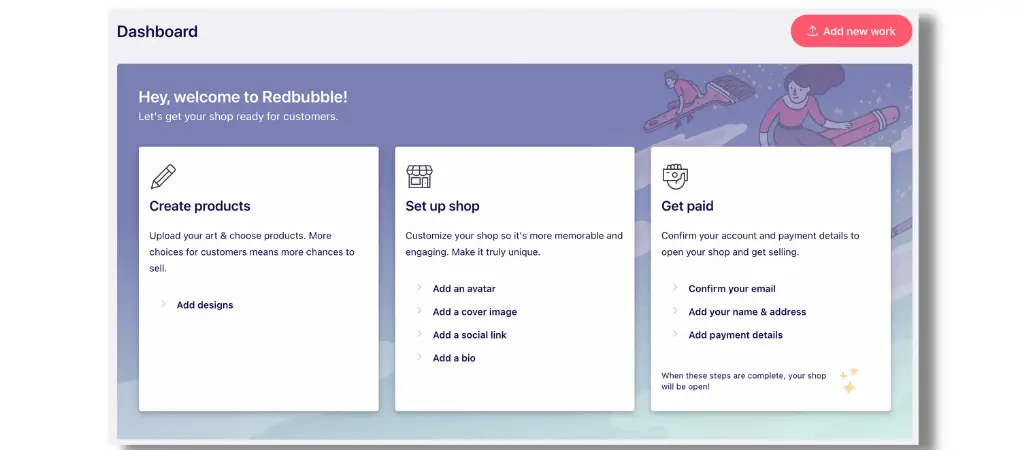
Set up your shop accordingly by following the steps in each section.
Note: Make sure to confirm your account and your payment information (PayPal & Bank account).
2. Uploading Your First Artwork To Redbubble
Now that your account is confirmed, let’s start uploading your first design.
I would recommend uploading your artwork in a Transparent.png file format.
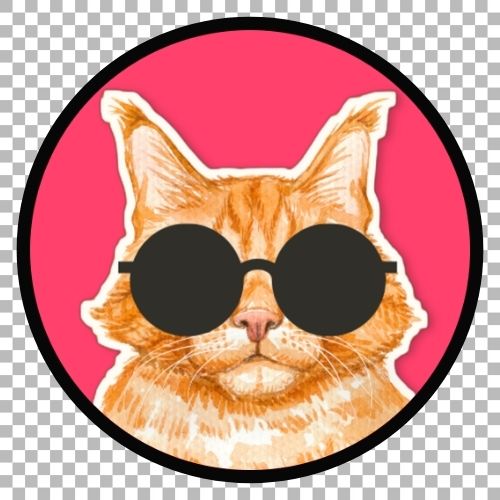
For this tutorial, I’ll upload this image as an example.
Tips: To save a transparent background, I personally use Canva Pro. You can easily make one yourself, and it is much more convenient. If you’re really into print-on-demand, Canva Pro is a good investment.
In your Redbubble account, click on your Profile Pic in the upper right corner and select “Add New Work”. Then you’ll have the following screen.
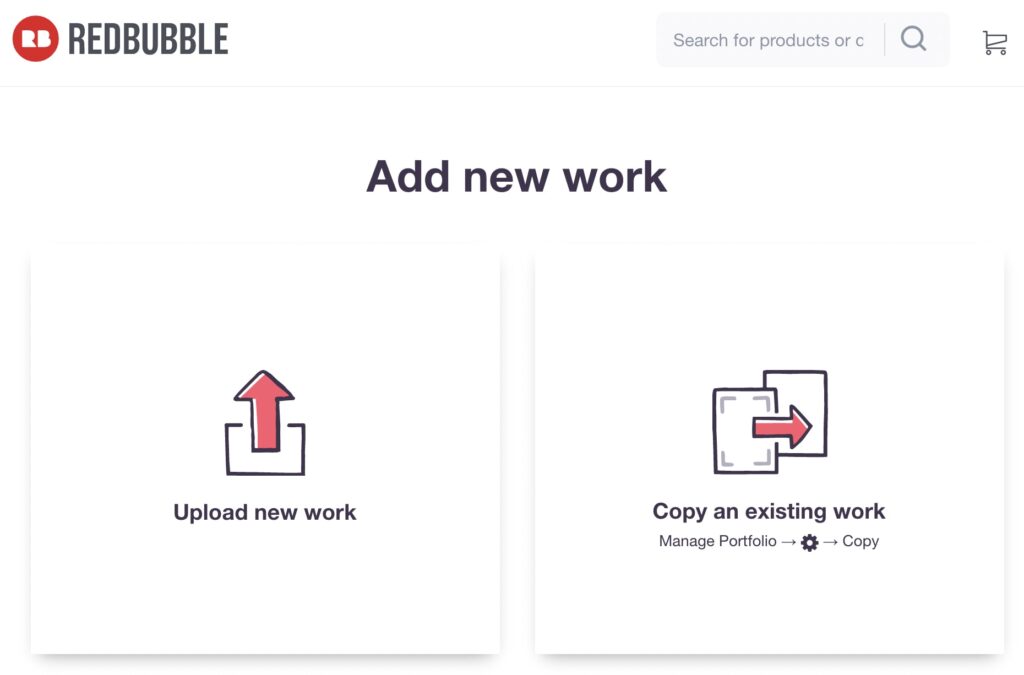
Since this is going to be your first artwork, click the “Upload new work” or simply drag and drop your artwork into the box area.
In the case where the settings for your new artwork are similar to those of an existing listing, click the “Copy an existing work” button.
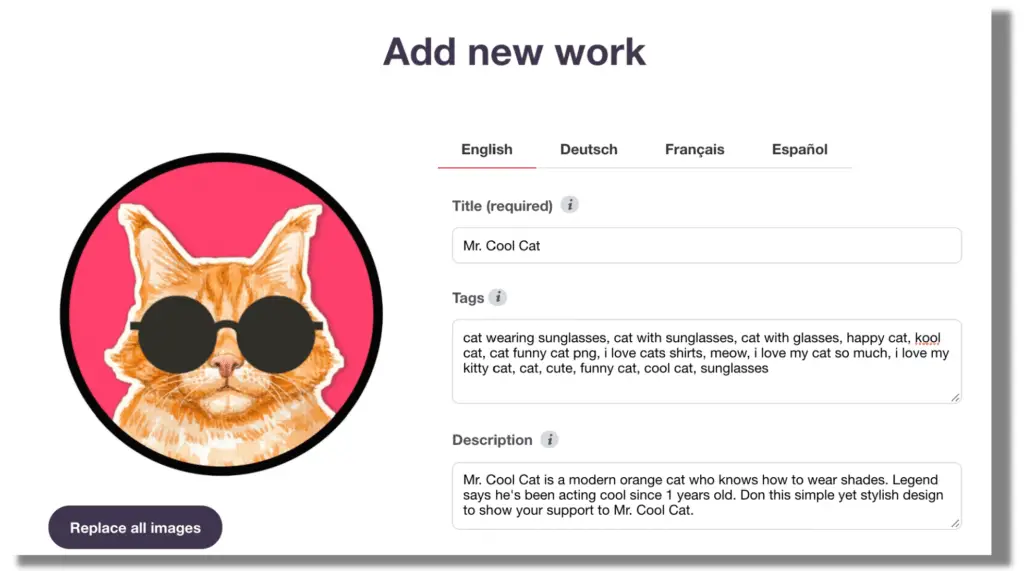
Once uploaded, you’ll have the following screen.
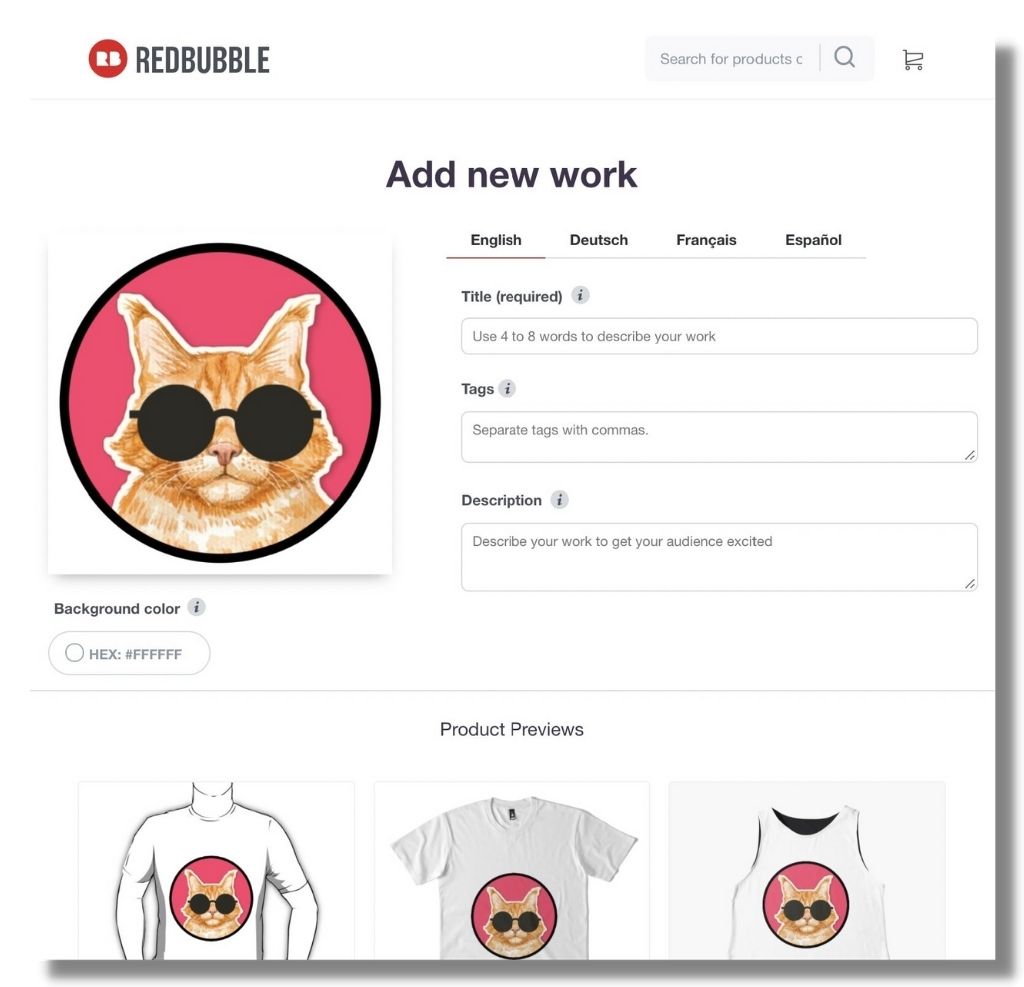
Before we proceed to adjust your artwork (change background color & positioning), let’s fill up the required fields first: Title, Tags & Description.
3. Fill Up Title, Tags & Description
I’ll break down each of them as below:
- Title: Describe your work. It’ll be easier for your audience to discover it.
- Tags: Provide 15 – 20 descriptive tags. Think about how your audience might search for the work. Use commas to separate each tag.
- Description: Provide your audience with a unique description of what your work is about.
Here’s an example:
4. Adjust Your Artwork
Next, scroll down to the Product Previews section.
Make adjustments to your design by clicking the Edit button on each product.
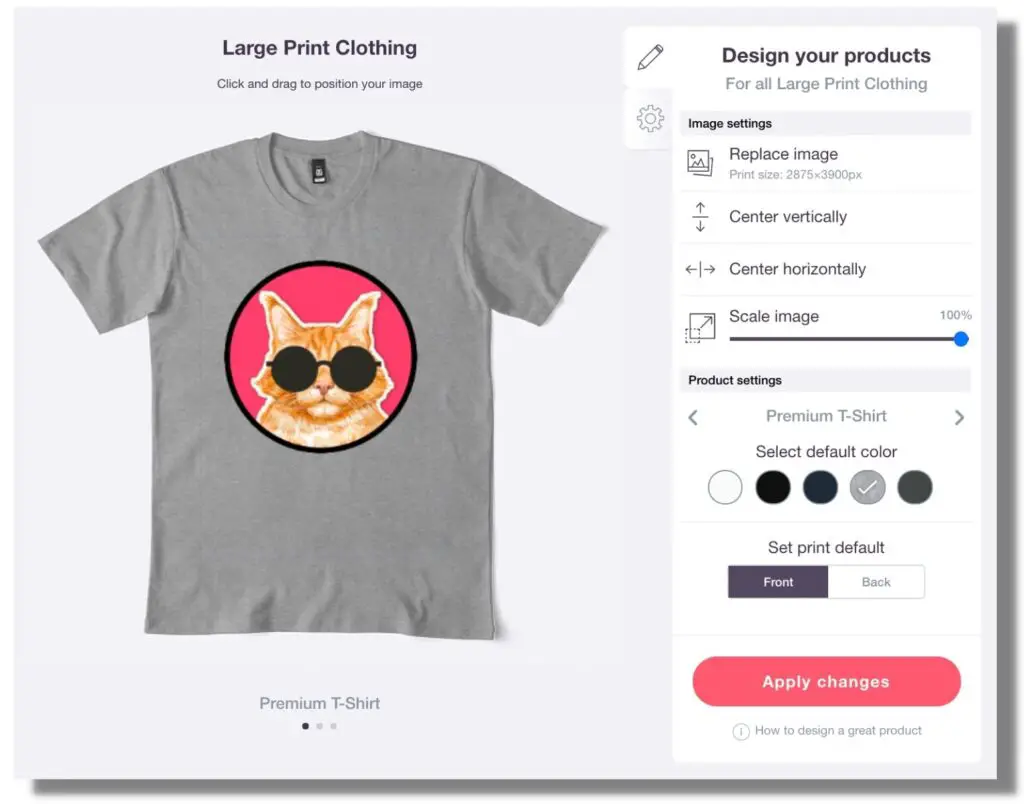
Whenever you are happy with the adjustments, click Apply changes and move on to other products.
5. Enabling & Disabling Products
How to enable/disable the products?
Easy peasy.
Under the Product previews, you can click on the ‘Enabled/Disabled’ button to enable or disable all products in that line.
A green button indicates that the product line is enabled.
Refer to the screenshot below.
Your work will automatically be enabled or disabled on each product based on the size of your file.
Larger images are more likely to be enabled on larger products.
However, it is ultimately up to you to decide which product to enable/disable.
My 2 cents of advice, try to enable as many products as possible in order to increase the chance of getting more sales.
6. Save Your Work
You’re almost done.
Once you’ve finished enabling/disabling the products, scroll down, and you’ll need to fill up a few more fields as below.
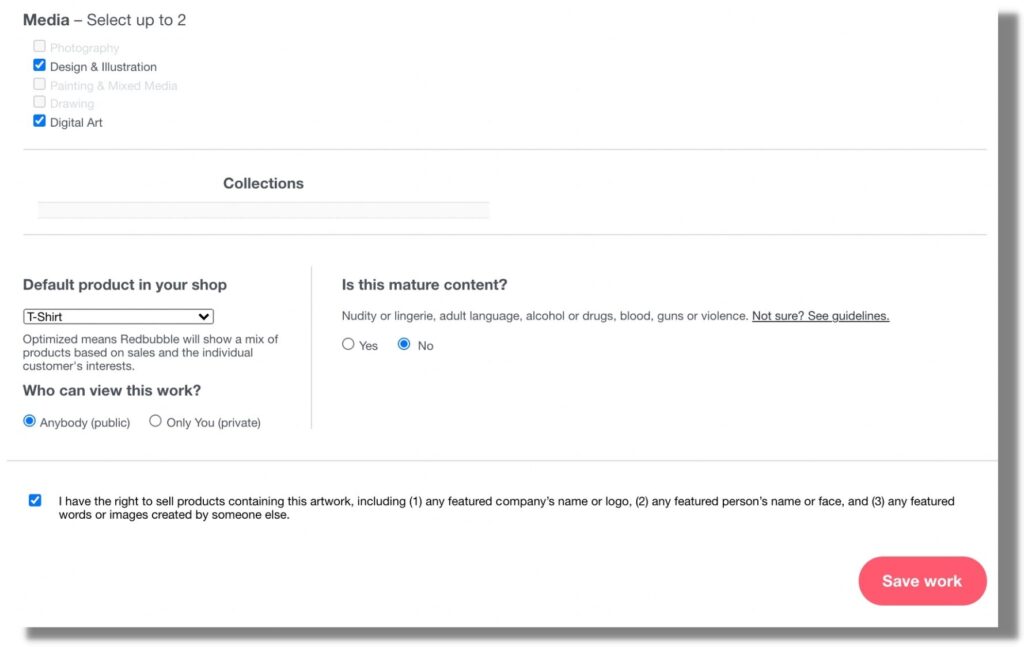
Here are the descriptions of each field:
- Media – Select up to 2: This is to describe the type of your artwork. Since mine is an illustration and digital art, I chose those two options.
- Collections: Your portfolio can be organized into collections, which function as galleries to display your work. If you don’t have any, you can skip this.
- Default product in your shop: To define which products look best on your artwork. If your artwork looks best on a T-shirt, hit the T-shirt.
- Who can view this work?: If you wish your artwork to be discovered by anybody, then select Anybody (public). Otherwise, choose Only You (private).
- Is this mature content? It’s self-explanatory. Only users who have agreed to see Mature work in their feeds will be able to see mature work.
- Confirm your rights: You must confirm that you have the right to sell the artwork. If you designed the artwork and there are no issues with copyright/trademark, then you’re good to go.
That’s it! Click the “Save Work” button , and Redbubble will automatically publish your artwork.
This is how your product will look once published:

Important: It is not possible to sell your work until you have provided Redbubble with your payment information, either through a (verified) Paypal account or a direct bank deposit.

Tips On How To Make Your First Sale on Redbubble.
Creating an account and uploading your artwork is easy.
Getting your first sales? Probably not.
You’ve put your life and soul into the artwork you created, and are hoping to get a lot of sales out of it.
Unfortunately, you end up with 0 sales.
Yes, that is the harsh reality. However, this wasn’t always the case. Some are lucky enough to get their 1st sale right away. Others aren’t.
But worry not! There’s always a way to break the code!
As opposed to bombarding you with one long list of tips, I’d like to break it down as below:
1. What’s Currently Trending On The Internet?
I personally chose this strategy as my first step in getting my first sale.
Before I started designing my artwork, I would prefer to do quick research on what’s currently trending on the internet.
By saying on the internet, I am referring to Google Trends.
Take a quick look at what is currently trending at that moment.
Once you find that trending topic, try to design your artwork with regard to that trending topic.
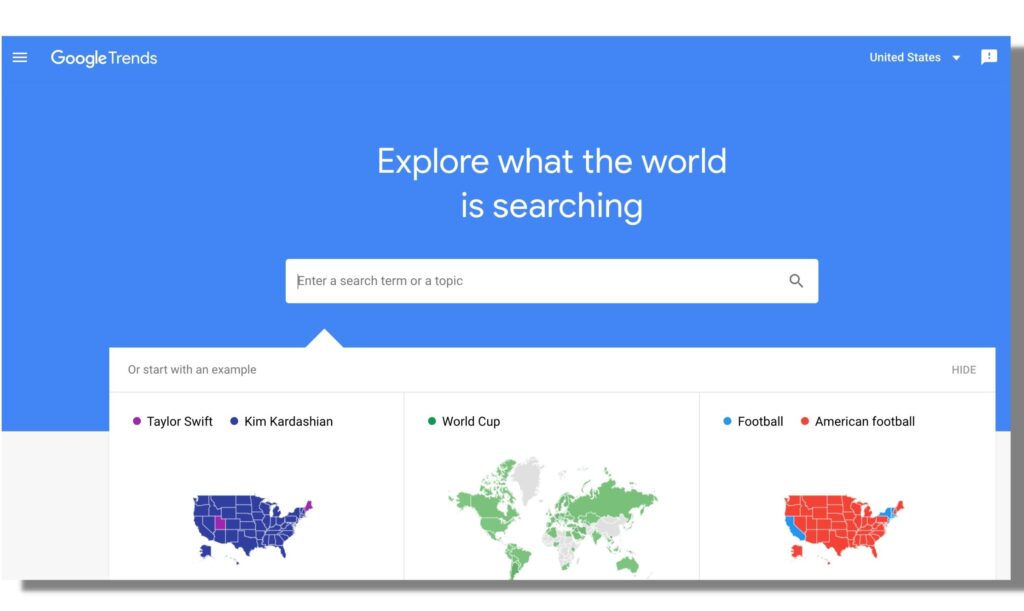
For example, the COVID-19 trend exists at the time of writing this blog post. As such, I would try to make a design with regard to COVID-19.
Redbubble has the potential to have the designs you create on the site appear in a Google search result if you make a design based on what is currently being searched on the Internet.
Bear in mind that trendy trends are what everybody is searching for.
The last thing you want is to come up with a design that does not attract anyone’s attention.
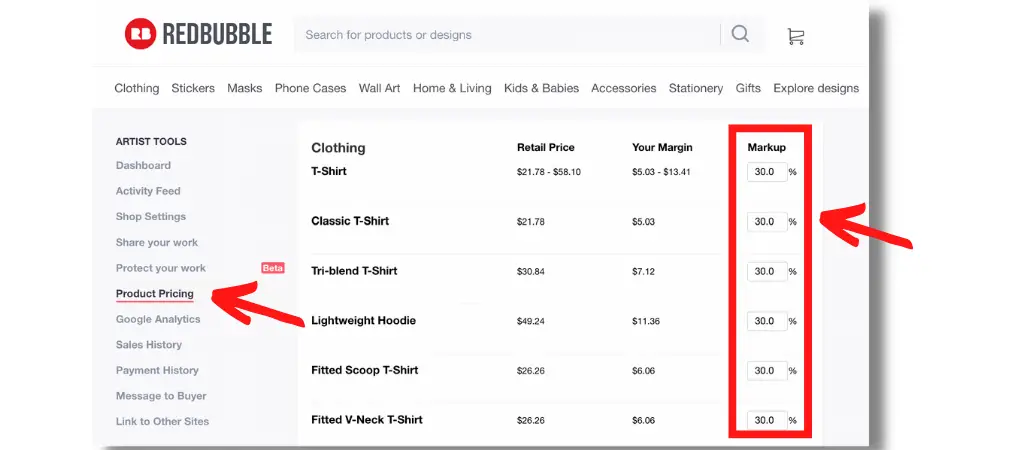
2. Set A Lower Margin Price
Redbubble’s artist margin is set by default to 20%. To what extent you wish to increase it is up to you.
For a start, I set my margin price within 25% – 30%.
By maintaining a lower margin price, you can compete with others, thereby increasing the chances of landing your first sales.
It is best to slowly raise the artist’s margin once you have a steady flow of sales coming in each month.
Play around with it and compare your prices with those of the top sellers.
3. Focus More On Stickers
Stickers are one of the all-time best-selling products on Redbubble.
My recommendation for getting the first sale is to focus more on stickers. By saying stickers, I mean sticker packs.
With each passing day, sticker packs continue to gain in popularity.
Redbubble sticker packs offer an entire sheet of stickers rather than individual stickers.
Having sticker packs is a great way to increase your chance of getting those first sales and earnings because customers are more likely to buy them (compared to a single sticker).
Why? You may ask. Simply because of the “Extra value” that they can get from it.
Just take a look at the comparison below.
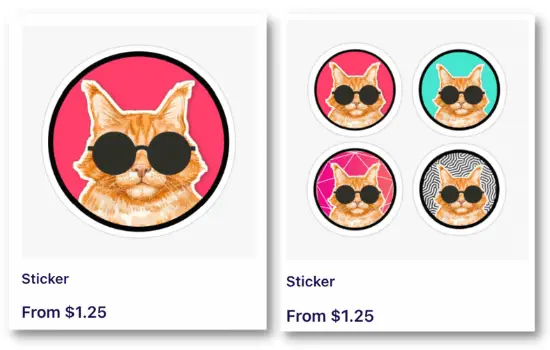
It costs the same, but sticker packs come with additional stickers and different designs (extra value).
What is the best way to create a sticker pack? The question may come up. I’ll outline the essentials of a sticker pack:
- You must save your file in PNG format.
- The artwork must have a transparent background. As mentioned before, simply use Canva Pro to save your artwork with a transparent background.
- It is important that your design be composed of items that are relatively distant from one another. Redbubble machines cannot cut them separately if they are too close.

4. Find Low Competition Niche
The goal here is to identify a low-competition niche. In a low-competition niche, there is a possibility that your design will appear on page 1, as Mr. Juna (Featured Artist) from Detour Shirts pointed out in one of his videos on Youtube.
Which eventually will increase the chance of making sales.
The idea of a niche with low competition is to narrow down your findings. Despite being in the same niche, your search is more specific.
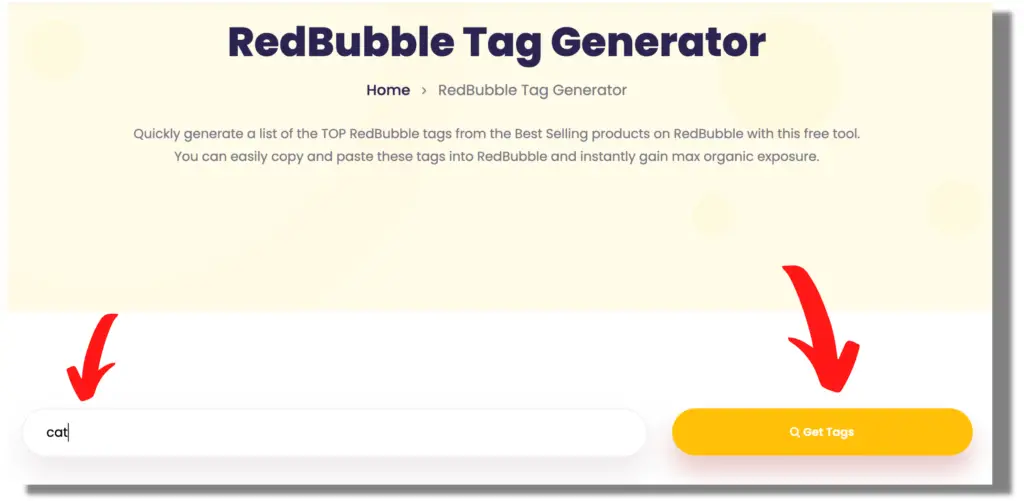
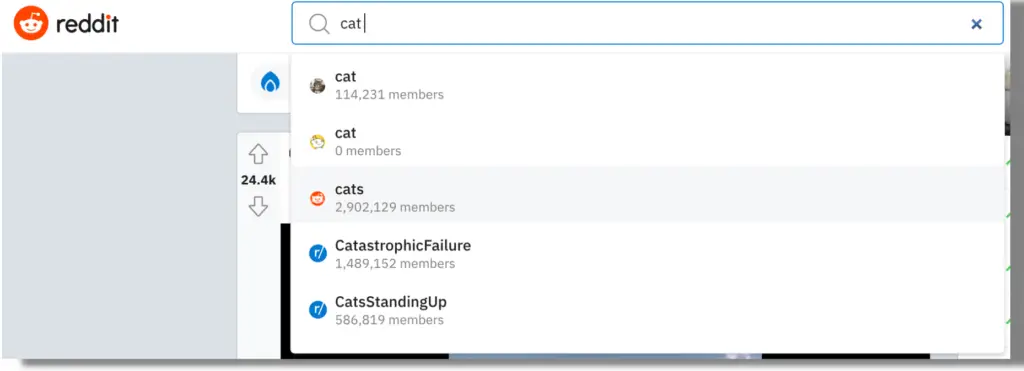
I’ll give you an example. Below are the search results after entering the word “cat” in the search field.
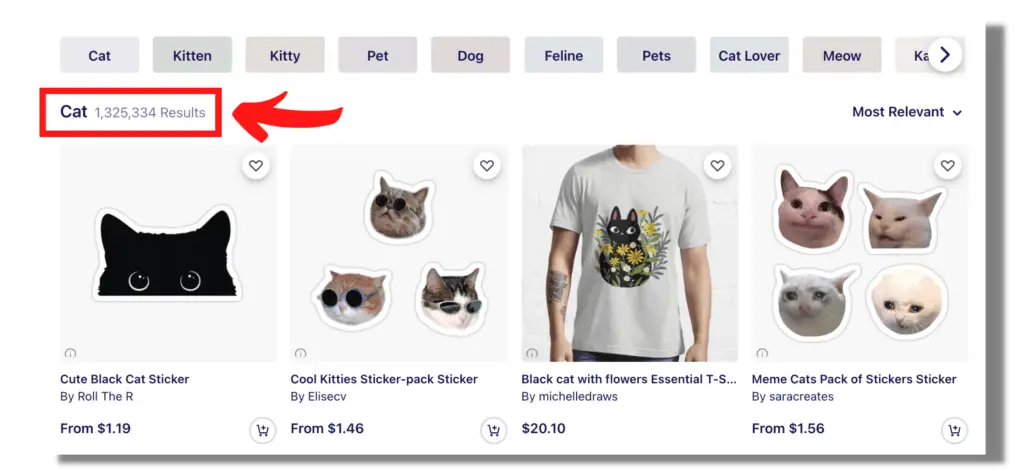
Notice that there are 1 million-plus results? This is definitely a high-competition niche that is almost impossible for us to compete with, especially as a beginner (new account).
And I would say that this is a supersaturated niche. As such, I would suggest you niche down your findings and try to find a low-competition niche.
Below is an example of a low competition niche:
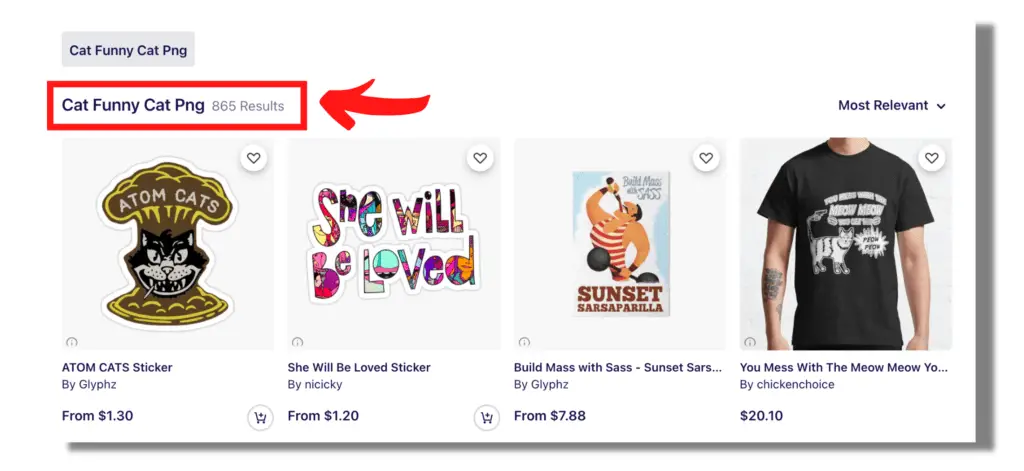
Have a look at the results. There are only 865 results. Less than one thousand results.
In choosing a low-competition niche, you will not only increase the possibility of appearing on Page 1 but also increase the likelihood of earning your first sale through it.
5. Consistency Is The Key To Success
You need to make sure that you’re consistent in the Print On Demand business.
You can’t just upload 50, 100, or 150 designs/artworks in a few days and just let it sit there for a few months, expecting to make sales out of it.
Redbubble would prefer it if you consistently upload new designs to your account daily.
The purpose of Redbubble is to showcase and sell your best work. In light of that, you are allowed to upload up to 60 designs/artworks to your Redbubble account every day.
For a start, try uploading 2-3 designs a day and slowly increase the number of uploads to your Redbubble account.
Generally speaking, the more designs you have, the greater your chances of making your first sale.
6. What’s Currently Trending On Redbubble?
I mentioned in the first tip about trending topics on the Internet and getting your artwork to appear in the Google search results.
Now, let’s talk about trending topics on Redbubble.
You might be asking how to search for trending topics on Redbubble. Have a look at the example below.
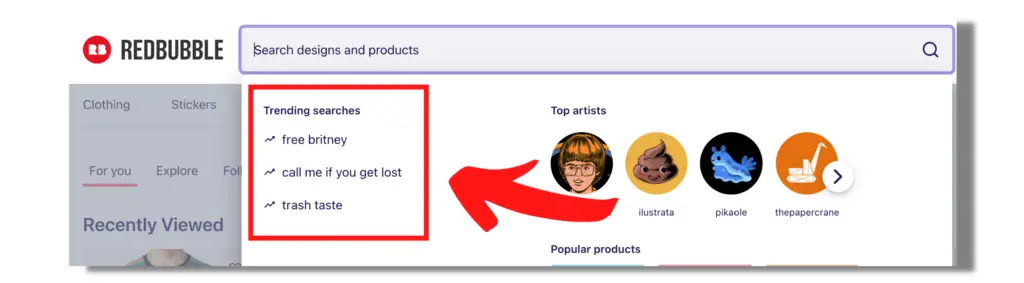
Simply place your mouse cursor in the search field, and you’ll notice the trending search results as shown above.
Study each trending search and have a look at other designs/artworks that were uploaded by other artists.
You should try coming up with unique and different designs to compete with the other artists.
By creating artwork that is based on what’s currently trending, you have a higher probability of landing your first sale, as people are searching for what you’re creating.
That’s it. Those are the main tips that you should focus on to get your first sale on Redbubble.
Extra Redbubble Selling Tips.
Now, here are some of the “Extra sauce” tips that you wish you knew before you start selling on Redbubble.
1. Tags Strategy
On Redbubble, tagging your artwork is a great way to ensure maximum exposure for that artwork.
By correctly tagging your artwork, there is a chance you can rank higher on Redbubble and search engines like Google, which eventually leads to discovery and sales.
Tags are an important tool to encourage new and wider audiences to purchase an artist’s work. Artists underestimate the importance of tags and underutilize them.
The tags on your artwork facilitate audience discovery.
Each upload should have 15 relevant tags. Ensure your artwork can be found using the searching terms your intended audience would use.
Bear in mind that each word should be separated by a comma. Example: cat, shades, summer, cute cat.
Important Note: Avoid tags spamming at all cost. The last thing you want is your Redbubble shop being suspended without further notice.
Here is an example of the Tags format Passive Marie uses in one of her YouTube videos. She deserves kudos for sharing this outstanding tag strategy.
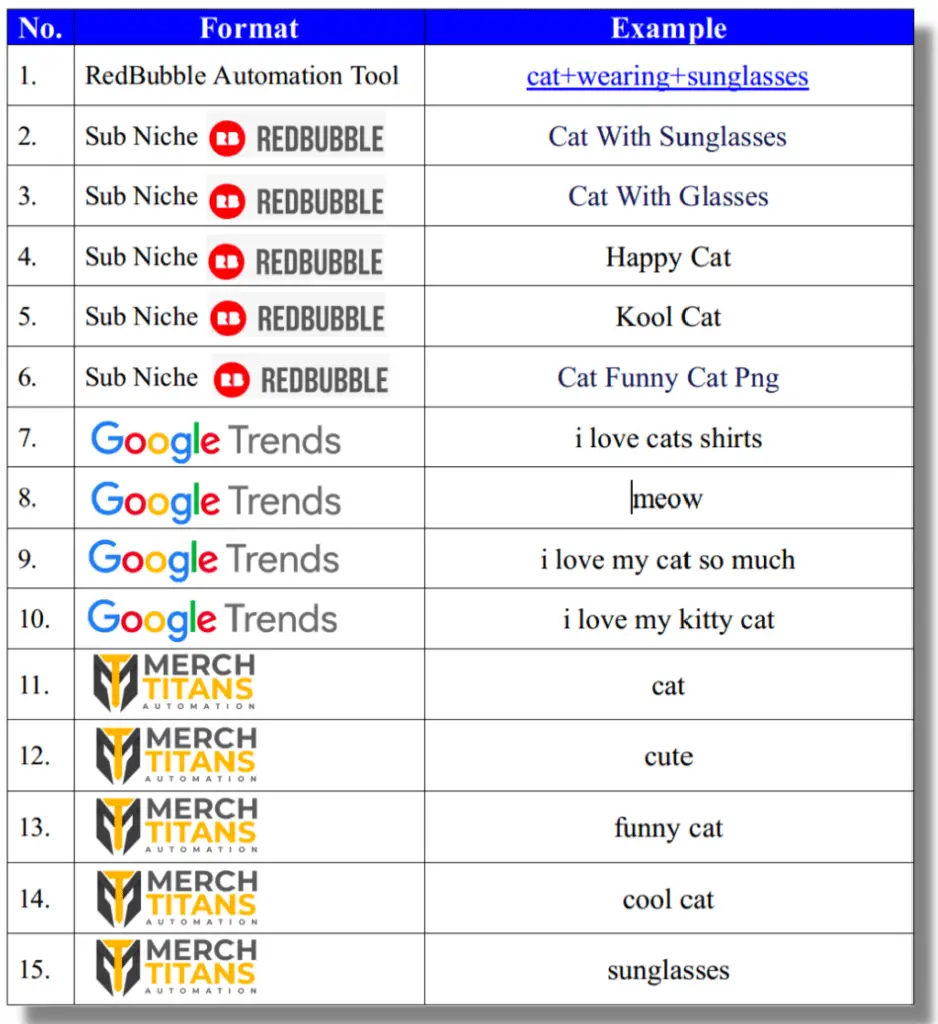
For you to understand it better, I will break it down as follows:
i) Redbubble Automation Tool
With the help of this tool, you can see what’s currently popular on Redbubble and how the most popular tags change week to week.
This tool allows you to quickly determine which tags gained popularity in the last 7 days. Moreover, you can see the number of results for each tag, which helps you determine whether the niche is worth exploring.
In this example, I have chosen “cat wearing sunglasses” as the tag.
ii) Sub Niche In Redbubble
A sub-niche is a smaller topic inside a bigger topic. For instance, if the niche is “cat”, then a sub-niche is “cat wearing sunglasses”.
You may utilize the sub-niche that is available on Redbubble as per the screenshot below.

The further down the sub-niche you go, the fewer the results are going to be. Which is a good thing (less competition).
You may choose a sub-niche that has 0-200 results. By doing so, there’s a chance for your design to appear on the 1st page of the results.
In such a case, if you can’t find tags with fewer than 200 results, choosing tags with fewer than 1000 results would be fine.
iii) Google Trends
Again, you can use this tool to find keywords that are currently trending.
The idea here is to search for trends in the niche of the design you are creating and find related keywords.
Google search volume is categorized from the most popular search to the least popular search.
You are free to select whichever keywords you think is suitable for your niche/design.
iv) Merch Titans
It is one of the first automation tools designed exclusively for print-on-demand businesses.
With the help of Merch Titans (affiliate link), you can upload your designs to various platforms, making this process quicker and less tedious for you.
The influx of uploads to various platforms will ultimately result in you making more money.

This tool is also useful for identifying popular tags on Redbubble.
Now, on the Merch Titans website, simply select the RedBubble Tag Generator and enter the keyword of your designs.
Analyze the top tags and any other relevant tags that you feel are relevant to your designs once the results are displayed.
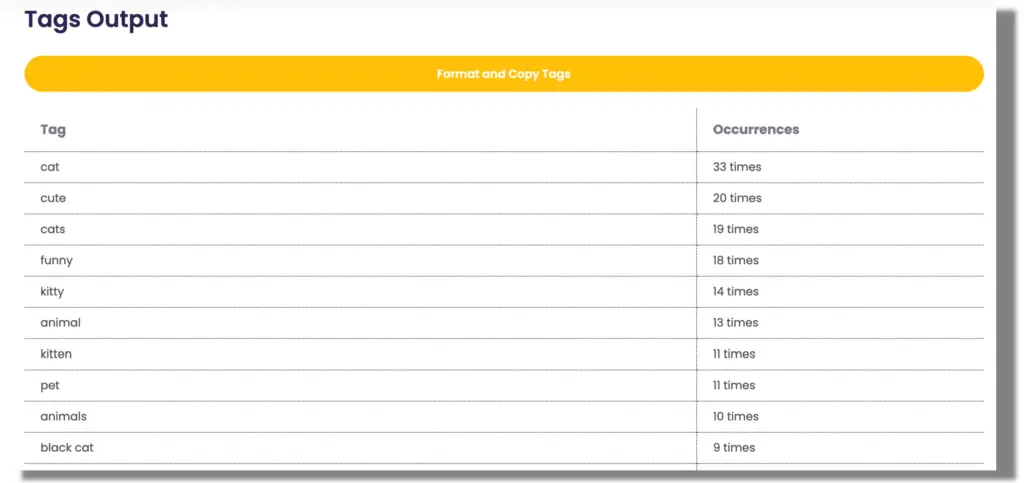
Simply copy your chosen tags and paste them into your Redbubble tags field. Enough said on tags, now let’s move on to the next extra tips.
2. Write a Good Product Description
Next is the description part. As stated by Redbubble, Google watches descriptions.
This indicates that you shouldn’t take the description for granted. When you upload the artwork to Redbubble, be sure to include your artist description.
As part of its SEO (search engine optimization) ranking, Google keeps track of Redbubble descriptions.
In order to get more views on your artwork, you need to make sure your descriptions are complete.
We know that creating a good product description can be challenging. Part of the key factor that could determine a customer’s decision to complete a purchase is the product descriptions.
This is the section where you should explain all the details of your designs.
Now, I am going to share with you 4 ways how you can create a good product description on Redbubble.
i) Find Inspiration From Top Sellers
Finding inspiration from top sellers on Redbubble is one of the ways I approach writing the product description. Aside from their attractive designs, their descriptions play an important role in helping them generate more sales.
The key here is to get a rough idea of how they describe their artwork, not to imitate them exactly.
ii) Add a Story About Your Artwork
I enjoy creating artwork that tells a story. I love the idea of people seeing my art and feeling like they can relate to it in some way. Therefore, telling a story of your artwork in the product description is a good idea too.
But just make it short and simple.
iii) Insert Trending Keyword in Product Description
Incorporate the trending keywords in the description of your artwork if you intend to create artwork based on trending topics. This will increase the likelihood of your artwork being picked up by Redbubble’s algorithm and recommended to their large audience.
iv) Create a Product Description That Packs a Punch With an AI Tool
The new AI-powered tool ensures that your product’s potential buyers are hooked the minute they see it. This is because these descriptions are written with an understanding of what you need. They know how to describe and build anticipation for the product on the page.
The best part? You can even personalize these descriptions to make them sound like they were written by your own copywriter!
Personally, Rytr.me helps me get over the “stumble block” I encounter when writing product descriptions.
Rytr.me is a revolutionary writing assistant that helps copywriters create descriptions for products, landing pages, website copies, blog posts, and much more! It’s easy to use and can be used from anywhere with an internet connection.
Let’s have a look at the screenshot below on how it works.
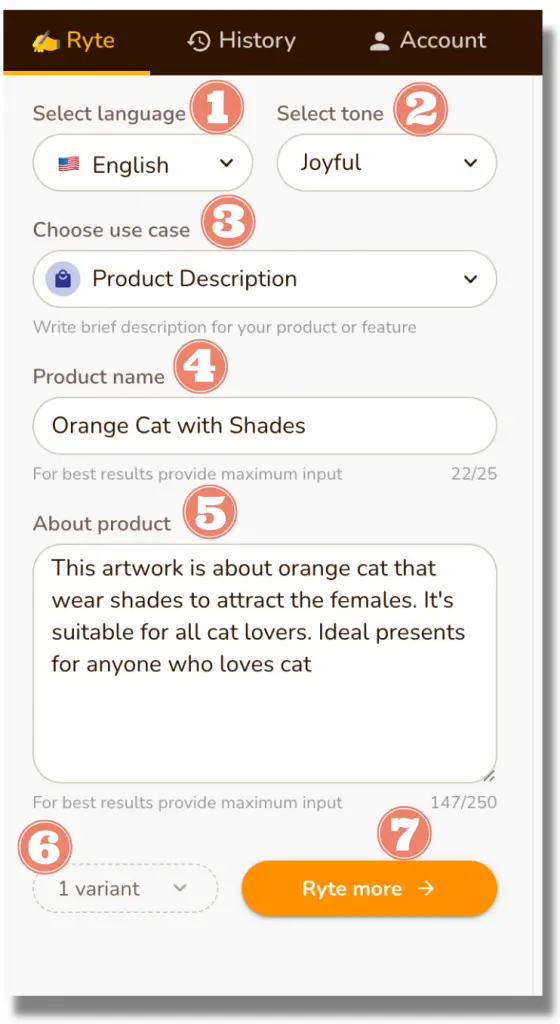
- Select English
- Select the tone – for this example, I choose Convincing, Compassionate, Joyful & Passionate
- Choose Product Description as a Use Case
- Enter your artwork design title
- Give a brief explanation of what your artwork is all about
- Select how many variants you want Rytr.me to produce
- Finally, click the “Ryte for me” button
Here’s the screenshot of the outcome.
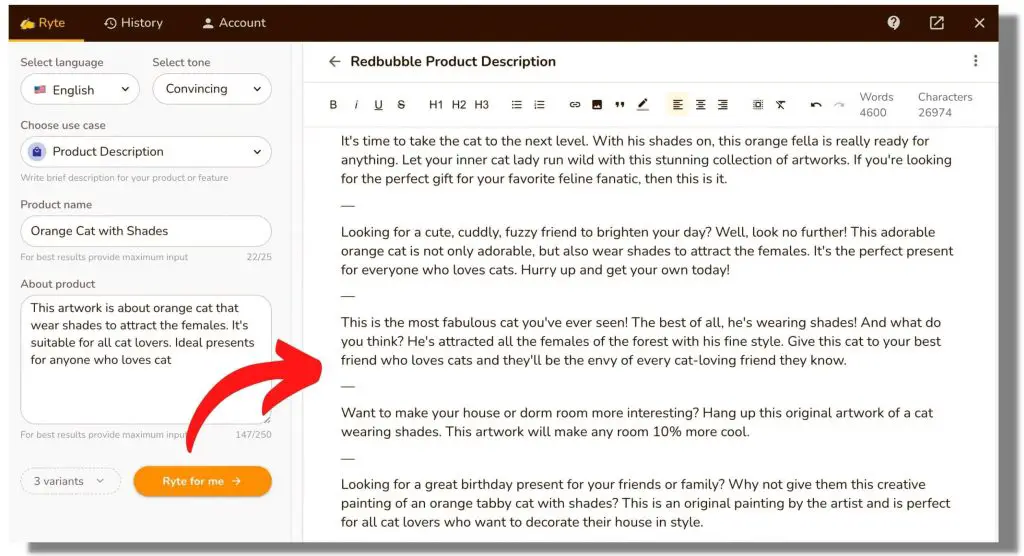
Isn’t that cool? It literally took me less than 5 minutes to curate 5 product descriptions!
Writing product descriptions with this AI tool is almost effortless.
Sign up with Rytr.me and create a free account, and give it a try.
The only catch? The free account comes with limitations. You can only generate 5000 characters per month. Trust me, that 5000 characters seem a lot, but you will reach that limit even in just a few days.
This is why I personally subscribed to their Unlimited plan at just $29/month (which is very affordable compared to other AI writing tools).
Side Note: You can make money with this AI writing tool by offering writing gigs on any freelance platform.
3. Enable As Many Product As Possible
Whenever you upload your artwork, make sure to enable as many products as possible. Why did I mention as many as possible?
Because it depends on the artwork that you uploaded.
Occasionally, it is possible that some of the artwork you upload won’t look good on a certain product.
Hence, consider designing an artwork that you think will look great on all Redbubble products.
Depending on the artwork you upload, you would never know what products your customers would be interested in.
It might be that by enabling products as many as possible, you end up getting a few sales just from one customer who decides to purchase a T-shirt, Sticker, or maybe even an iPhone case.
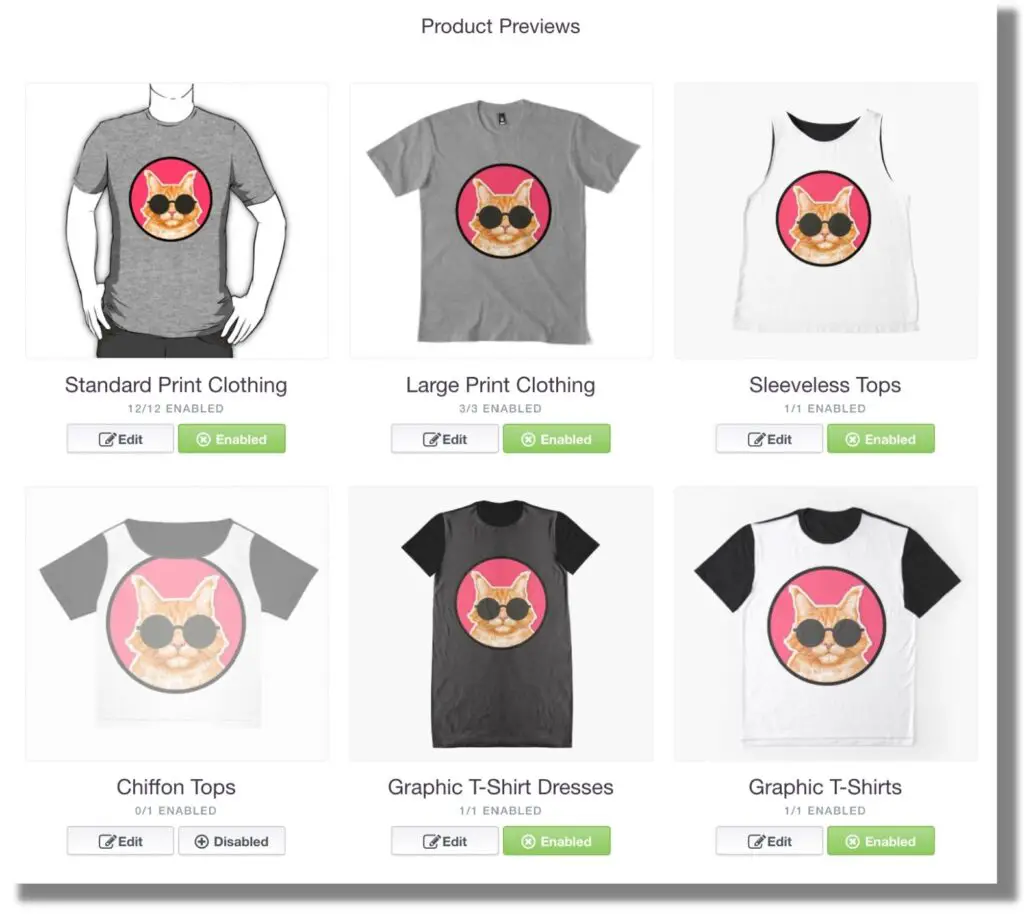
For example, refer to the screenshot below.
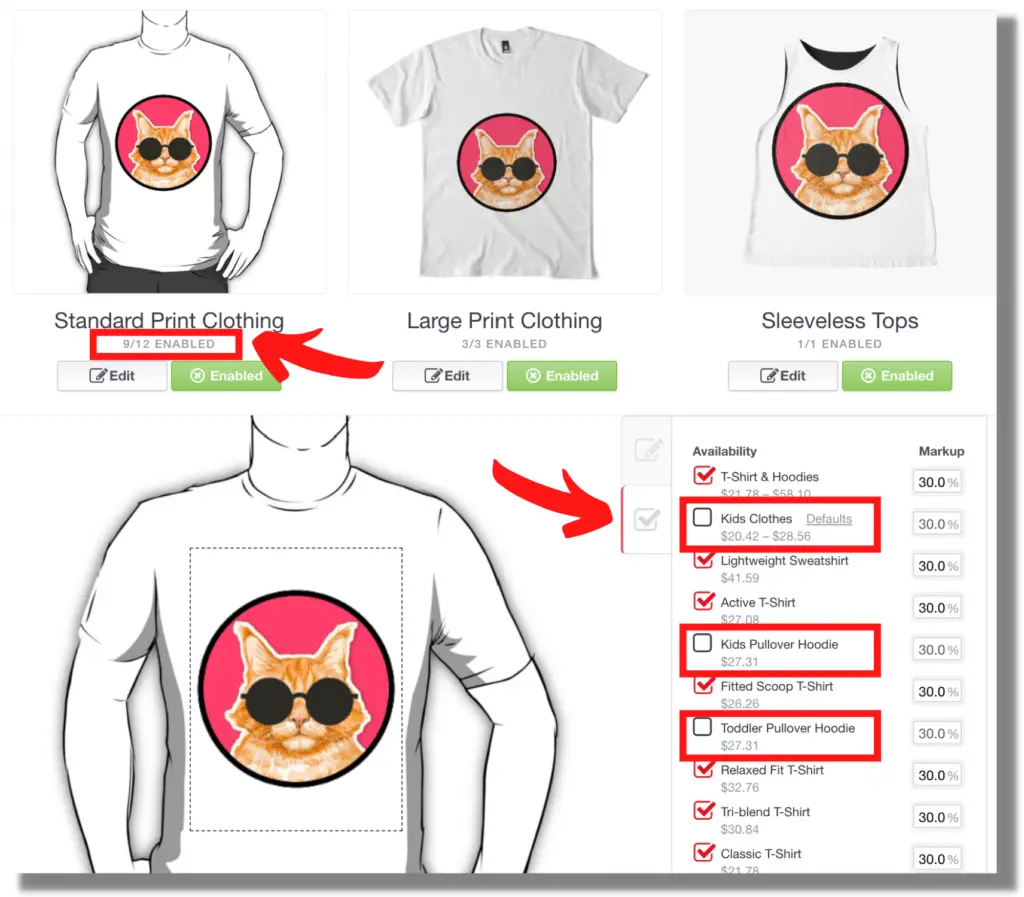
On each product, there’s an indicator to let you know how many products are enabled. As shown above, Standard Print Clothing currently has 9 out of 12 products enabled.
Thus, follow the steps below to enable all the products:
- Click the Edit button
- Then click on the second tab
- Enable whichever products you wish to enable
- In this example, it’s the Kids Clothes, the Kids Pullover Hoodie, and the Toddler Pullover Hoodie
- Lastly, click the Apply button for the changes to take effect
4. Copyright / Trademark / Publicity Rights
The community of Redbubble is constructed on the principles of respect and recognition for artists.
When posting your work on Redbubble, please keep this in mind.
Make sure that all of the original ideas you upload on Redbubble are your own and do not infringe on the intellectual property rights or publicity rights of others.
The law prohibits taking someone else’s work and passing it off as your own.
Have a look at the following:
- Copyright: A legal protection exists for the expression of an original idea that is depicted in a tangible form, for example, artwork in the form of photographs or paintings, and literature in the form of poems or stories.
- Trademark: Consists of words, symbols, designs, and logos that identify and differentiate the source of goods.
- Publicity Rights: The right to protect an individual’s image, name, and likeness. It means you cannot exploit someone’s identity for your own benefit without their consent.
In this regard, it is important to be aware that uploading an artwork that violates the rule will result in the removal of your artwork or, worse, the suspension of your shop without prior notice.
To make the process of checking the trademark easier for you, simply visit United States Patent and Trademark Office website as below.
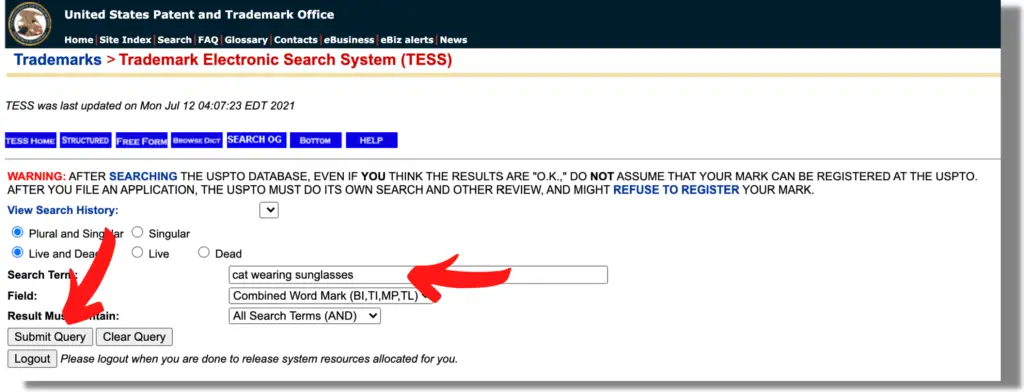
Enter any keyword that you wish to include in your artwork, and then click the Submit query button.

As long as your query does not return any TESS records (as above), then you are safe to use the keyword in your artwork.
5. Promote Your Artwork
It is important to promote your own artwork across your social media platforms, even though Redbubble receives a vast amount of traffic each month.
A successful artist knows the importance of marketing their work. And the truth is, it can actually be a fun and relatively painless process.
I won’t talk about Facebook, Instagram, Pinterest, or maybe Twitter. There is no doubt in my mind that your knowledge exceeds mine.
It is strongly recommended that you also promote your work as follows:
i) Link your Redbubble shop from your own website or blog
Promote your artwork on your own website or blog. By sharing your design process, tips, and tricks, or maybe behind the scenes, you may indirectly promote your artwork to your audiences.
An ultimate step by step guide is available here so you can start your own blog from as low as $2.95/month. Feel free to check it out.
You can link your own website to your Redbubble shop by copying and pasting the embedded script.
Displaying your designs will help your audience know where to buy them.
ii) Take advantage of Reddit / Subreddit traffic
As claimed on their website, Reddit is the front page of the Internet.
That shows us the vast amount of traffic they are getting daily. Thus, you should take this advantage to promote your artwork with proper conduct.
Proper conduct means your actions are compliant with all rules & regulations, not spamming around.
Here’s a quick step-by-step on how to promote on Reddit/Subreddit:
- Considering my example artwork relates to cats, I would personally search for any subreddit associated with cats.
- Once the subreddit has been identified, read the rules to avoid getting banned.
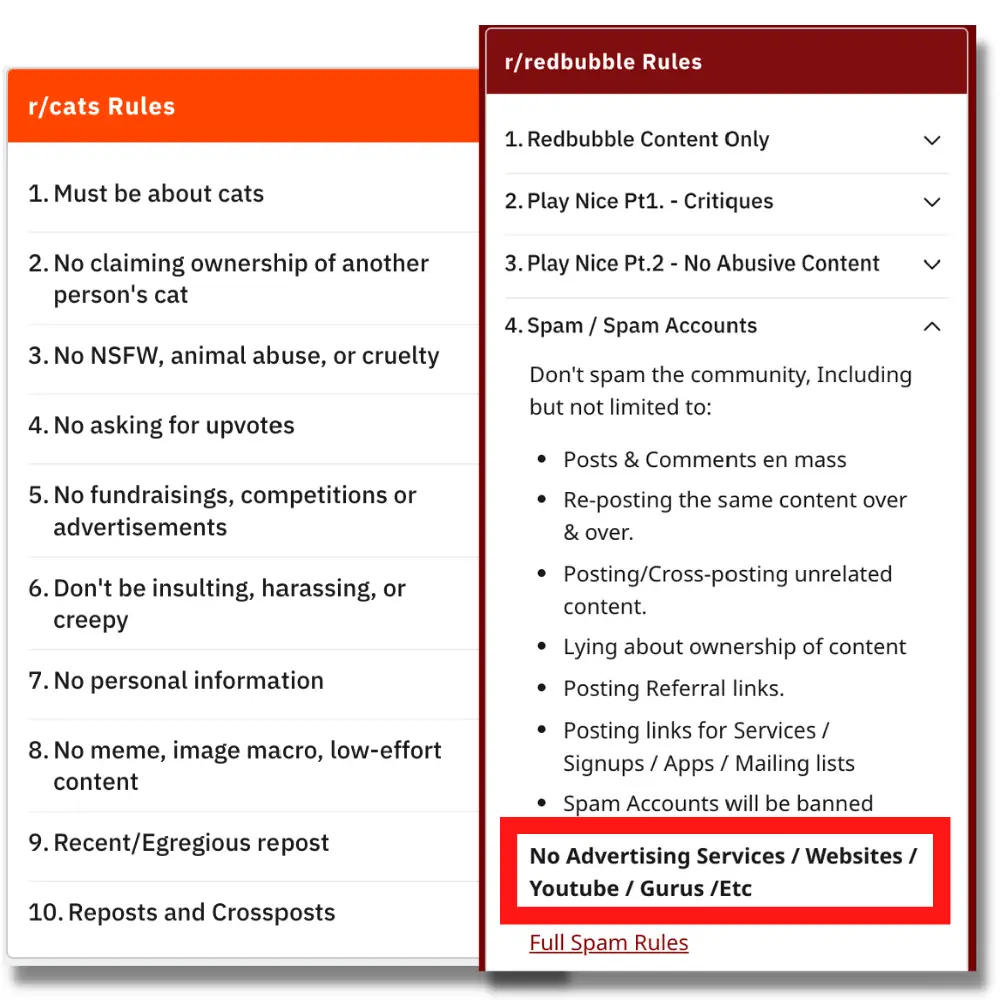
- If the rules stated that you are not allowed to advertise any of your artwork, search for other subreddits. Avoid promoting at all costs.
- You are safe to advertise your artwork if the rules do not specifically prohibit it.
- Here is my advice: give more value to the community before you start promoting. The more you give, the more you get back. It might be worth sharing some other info, news, memes, tips & tricks related to that subreddit. You’ve probably noticed that people hate hard sales, haven’t you?
iii) The rise of TikTok
TikTok doesn’t need any introduction. There is no question that TikTok has risen to the top now.
Since quarantine started, the app has seen tremendous growth, and it’s one of the most talked-about social media platforms.
With TikTok, every video is given a chance by being shown to an audience on the For You Page (FYP), regardless of how many followers you have. Yes, even if you have no followers at all.
Long story short, there’s a chance for your videos to go viral. That’s the beauty of this platform.
Tips: Avoid uploading a video that is too hard selling. People just hate it. Your video won’t get much attention if you keep on doing it that way.
Here are some ideas of what kind of content you can make on TikTok:
- Share videos on how you draw your artwork step by step.
- Take a quick glimpse of how you design your artwork in any software design.
- Share some Redbubble tips & tricks (provide value).
- If you are using Canva (affiliate link) to design, share about new Canva elements, or maybe create a short tutorial on how people can design on Canva.
- Create a behind-the-scenes video showcasing how you design a custom order. You can create a sticker with the person’s name on an iPad using the Procreate app or maybe design them on Photopea (It’s free). You should then tag that person’s TikTok account and let them know that the design is complete and they can purchase it at your Redbubble shop. When more and more people watch the video, they will surely request you to design their names too. That will certainly increase your sales!
6. BubbleMail
Alexandra Strambu (Redbubble’s Featured Artist) shared these tips in one of her YouTube videos about how we should enable BubbleMail to increase our Redbubble sales.
In case you are wondering, BubbleMail is a private messaging system that allows customers to send direct messages to artists via their inboxes.
Additionally, you can utilize it to connect with other Redbubble artists, too.
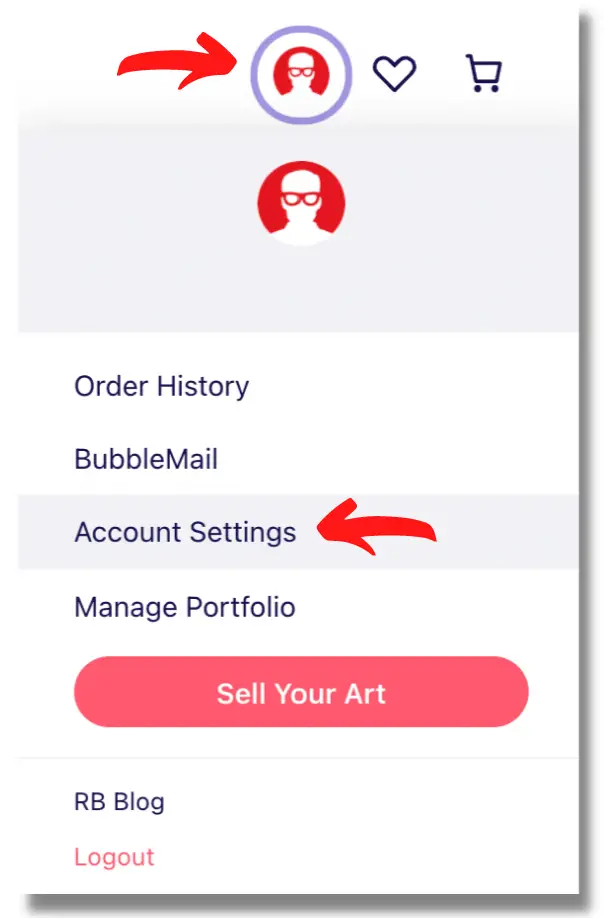
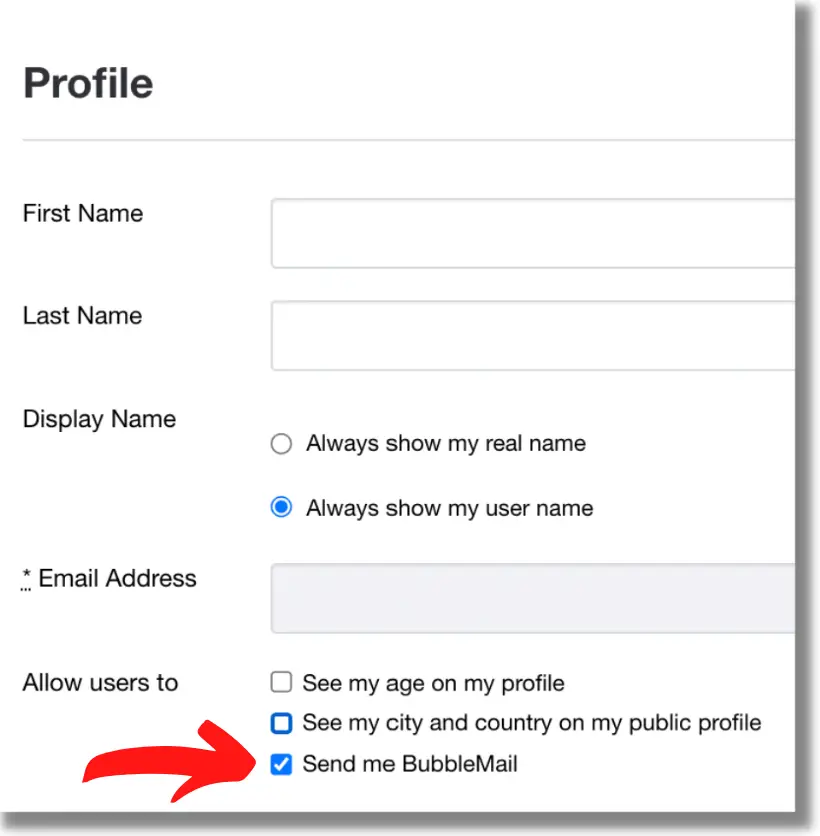
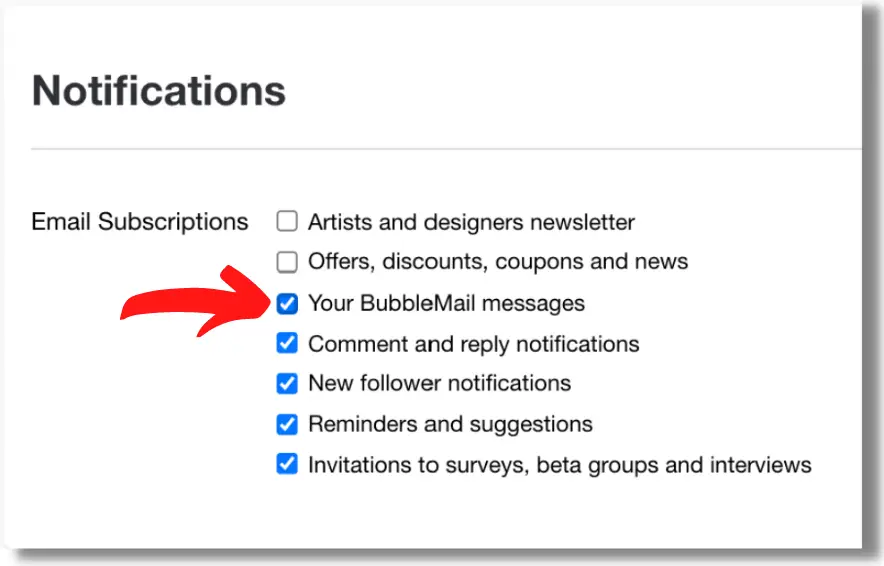
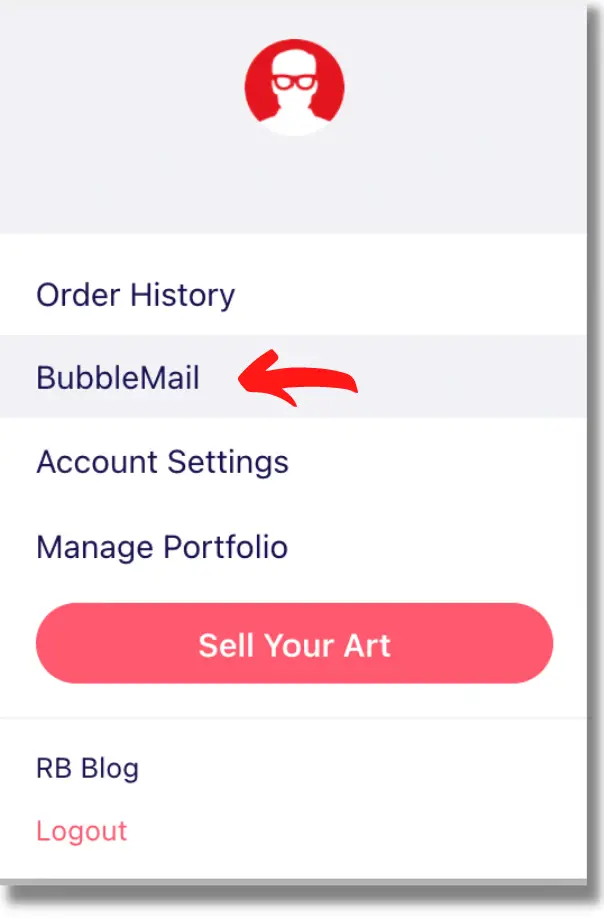
Follow the steps below to enable BubbleMail:
- Click your Username >> Account Settings.
- Scroll down to the Profile section, and select the “Send me BubbleMail” option.
- Then, select the “Your BubbleMail messages” in the Notifications section.
- Lastly, you may now access the BubbleMail as below:
You may receive a message from a customer asking for a variation on your designs. It might be that they want to change the color or font, or request something custom.
Therefore, make sure to constantly check your BubbleMail once it has been enabled.
That’s it! Those are all the tips & tricks on Redbubble that you can incorporate into your shop. Bear in mind that even if you have implemented all these tips & tricks, it won’t make you rich.
But at least it’ll help you get some nice side incomes.
A Valuable Lesson Learned (Mistakes To Avoid).
There have been a few mistakes I’ve made since I started selling on Redbubble, which have proved to be valuable lessons for me.
Since I believe this information may be useful to my beloved readers, I decided to share it all here.
Mistake 1: Copyright / Trademark Artwork
Back then, I was completely unaware that designing an artwork that had a copyright or trademark on it would be an issue.
Furthermore, there are endless numbers of artists on Redbubble who have copyrights and trademarks on their artwork. I can’t deny that they are making good sales out of it.
Not until one day, an email notification pops up , and the email says:
“We’re sorry, but we had to remove some of your artwork from the Redbubble marketplace because we received a complaint from someone alleging your artwork violates their rights.” – Redbubble Marketplace Integrity Team
Consequently, the artwork was taken down from Redbubble. As a newbie, that was a wake-up call for me to rethink all of my strategies before creating artwork on Redbubble.
Lesson Learned: Avoid Copyright / Trademark At All Costs
At this point, make a quick check to see if the designs you are planning to make have any copyright or trademark issues.
Having made this mistake prompted me to find ways to prevent any future issues relating to copyright or trademark. Consequently, I discovered the following website:
Simply enter the words that you are about to include in your designs in the field and click the Search button. For example, let’s just enter the word “Tom and Jerry”.
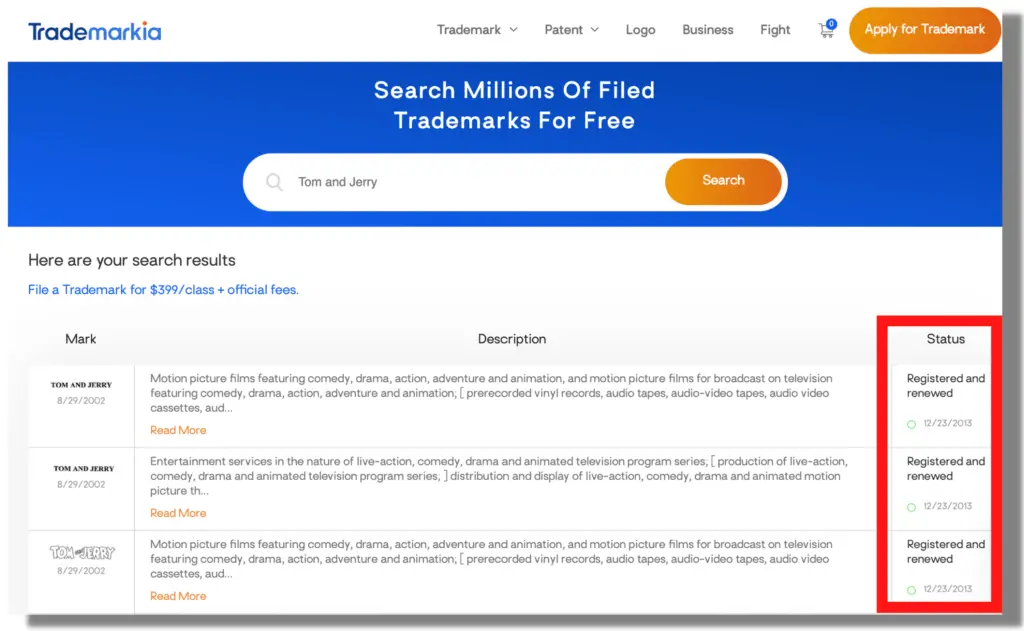
This trademark’s status clearly states that it has been “Registered and renewed”. Hence, it would be best to avoid having a design in this regard. However, if it is listed in the Redbubble fan art partner program, then it’s a safe call to proceed with proper guidelines (approval required).
Mistake 2: Mug Design Is Not Visible
My preference when uploading artwork to Redbubble is to align the design in the center of each product canvas. While previewing it, it generally looks great.
Well, this doesn’t apply to mugs.
Despite thinking that the actual product view would be good, I was completely wrong. The screenshot below will show you what I mean.
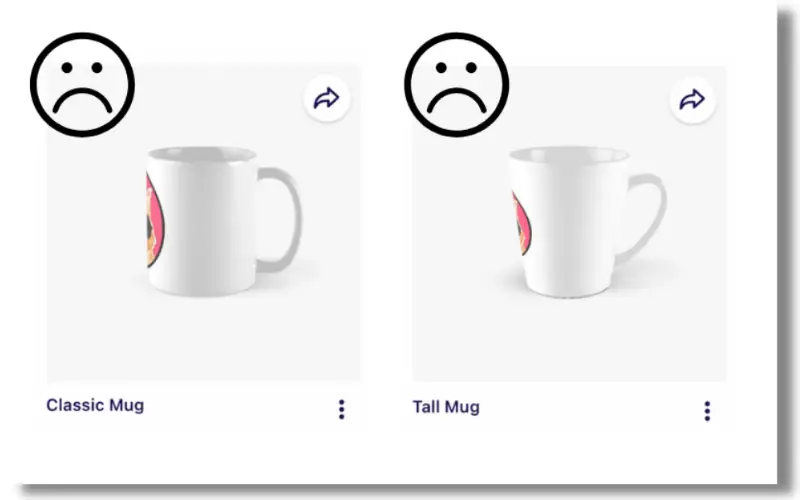
Notice that we can’t view the design on the mug? When a buyer browses your shop, this is what they will see.
Lesson Learned: Use Mug Template
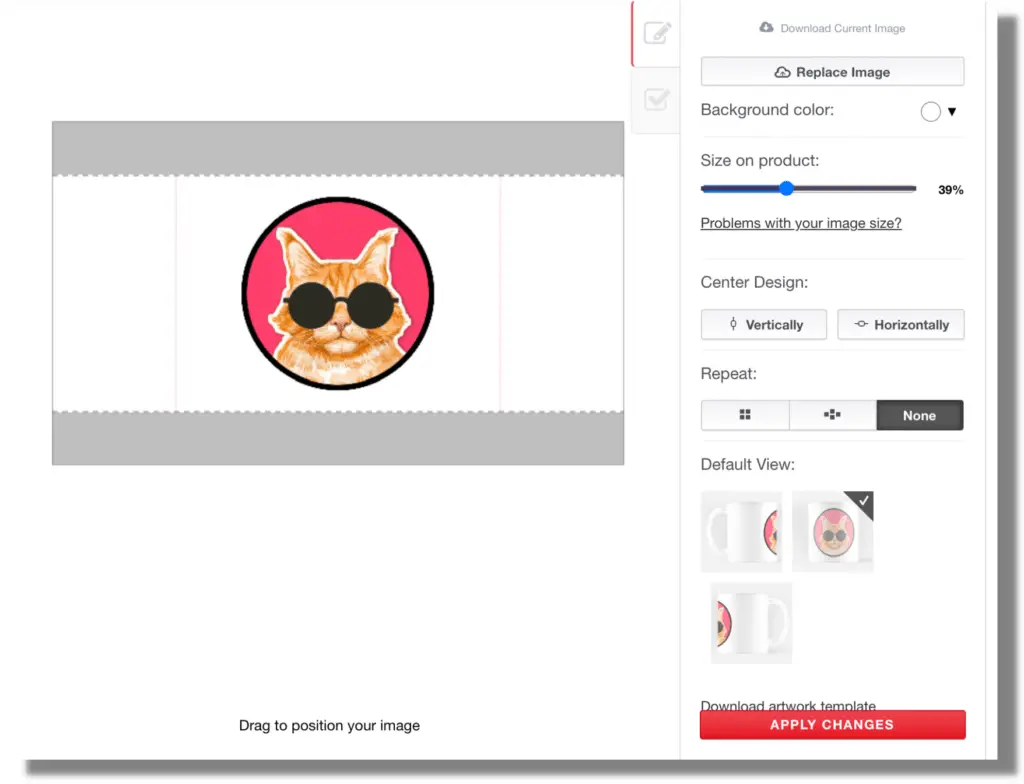
To prevent this from happening, simply download the template provided by Redbubble and edit it manually with Photoshop or Photopea.
In the template, duplicate your design and place it on both sides of the canvas.
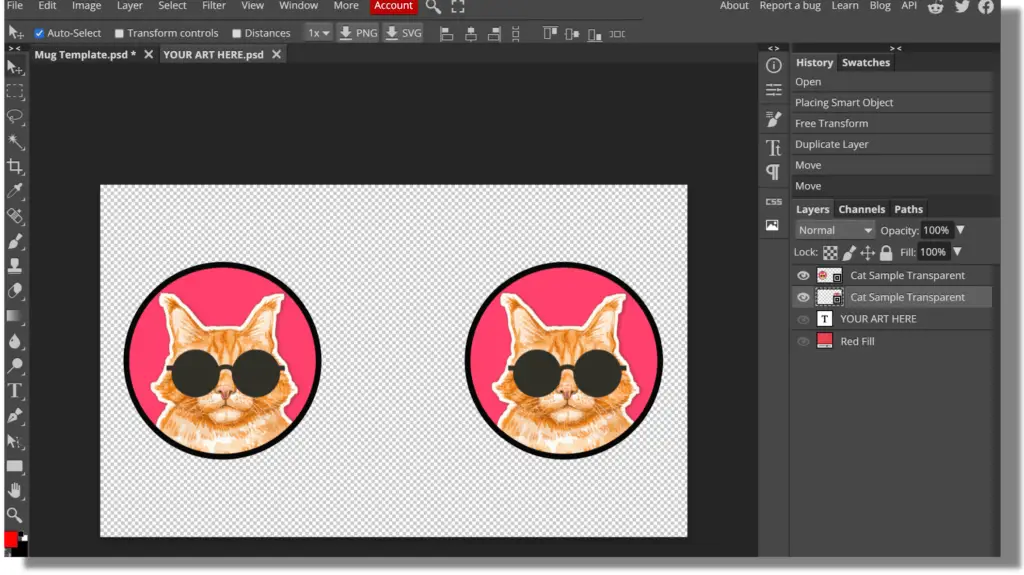
Saved it in PNG format, uploaded it back to Redbubble, and selected the default view accordingly. You should have something like this:
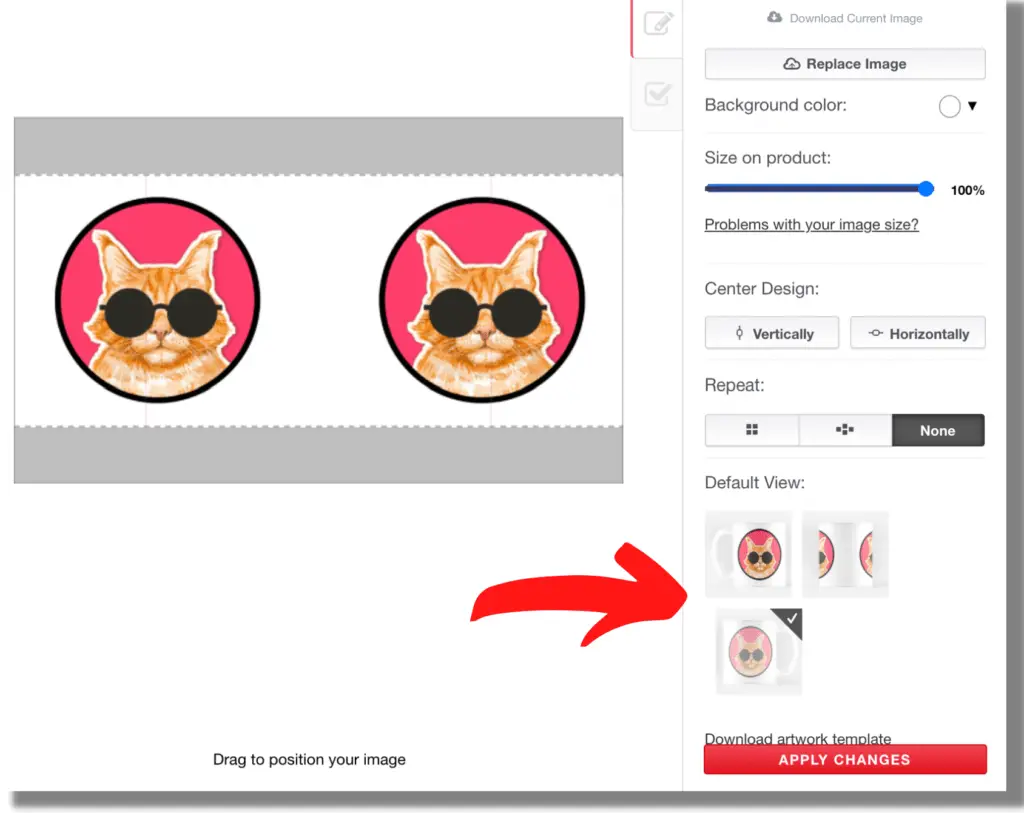
As shown below, your mug design will now become visible (Left & Right views).

Therefore, not only is the design now visible, but you will also have a better chance of converting visitors into sales.
Mistake 3: Transparent Background
One of the most common mistakes beginners make is forgetting to remove the white background. Yes, I made this mistake too.
As I was designing some of my first artworks, I didn’t realize that saving them without the transparent background would cause a different result.
Let’s get to the point. In the case of a buyer choosing a white T-shirt, there appear to be no issues whatsoever. However, choosing a different color will make this mistake obvious.
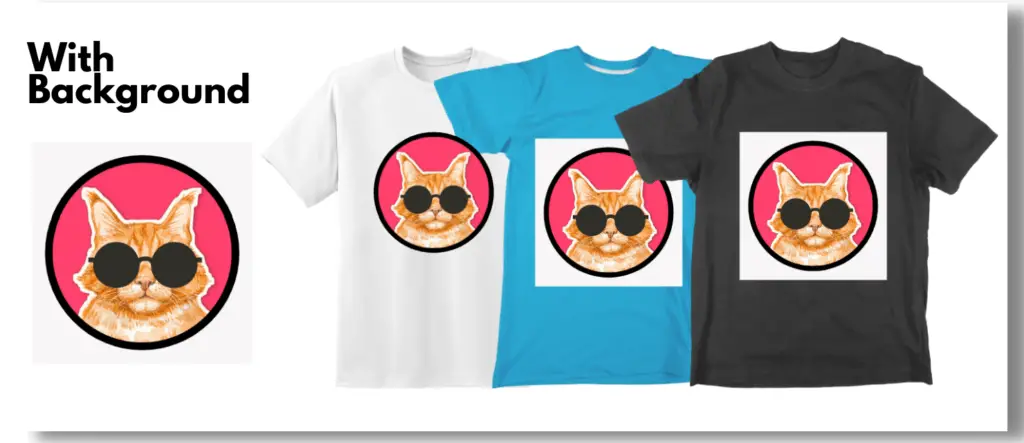
T-shirts in white are a perfect fit for this design. When it comes to colors other than white, I personally believe it looks unattractive. Don’t you agree?
Lesson Learned: Save Design In Transparent Background (PNG Format)
For a design of this type, I personally think that removing the white background is a better move. With Canva (affiliate link), getting the design saved in a transparent format is just a few clicks away.
Take a look at the result below:
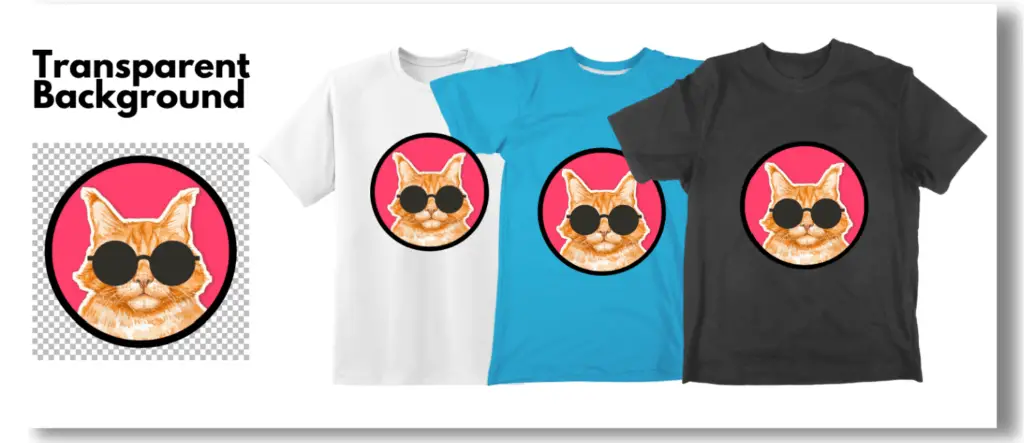
Would you agree that this design with a transparent background looks much better now? It is definitely a yes for me.
Final Say – Is RedBubble Worth It?
In terms of making money online, people may wonder whether getting $50 is worth the effort.
One might set a standard that making $100 will only be considered worthwhile.
In the end, it is up to each person how they define “worth it”. Early-stage strugglers who are trying to make money online are likely to say it is worth it.
And those who are already making a good fortune might or will hesitate whether Redbubble is the one for them.
Ultimately, only you can decide whether it is worth it or not.
You can find out for yourself by giving it a shot. There is nothing to lose. You either gain new knowledge or earn something. That sounds reasonable enough, right?
Regardless of what it is, let me share with you what conclusions I’ve drawn from this.
1. Zero Design Skills + Zero-Knowledge = Sales ($)
I know, it sounds a bit weird, right?
It’s impossible to imagine how someone with zero skills and zero knowledge somehow manages to make sales. Yes, that is how I started with Redbubble.
I never consider myself an artist. As a matter of fact, I have no design skills and am utterly ignorant of Redbubble. In spite of this, I did manage to get my first sale within 5 days of joining.
Again, I am not trying to brag here.
The point here is only to demonstrate that even someone without design experience can get started selling on Redbubble. As you progress, keep it slow and steady by learning at your own pace.
Don’t compare your Chapter 1 with other people’s Chapter 8.
2. Nice Passive Income, But It’s Not For Getting Rich
Yes, I would say that Redbubble is a nice way of building your passive income.
Redbubble handles the rest of the process for you; just upload your designs and invite customers to your shop. Having done this right, you may expect to get paid (if it reaches the $20 threshold) even if you stop uploading new designs.
Most people are struggling to make money online.
This is why I strongly believe that even receiving a small amount of money is still a valuable passive income (rather than nothing) and worth it.
To be brutally honest, this income won’t make you rich. Nonetheless, it would still provide some income to cover your utility expenses.
3. Gain New Skills + Knowledge
When you decide to start selling on Redbubble, even with zero skills and knowledge, it’s like embarking on a new path.
Your next step will be to search for online tutorials, how-to videos, and guides that will help you become a successful Redbubble seller.
Eventually, that journey would take you into the realm of new skills and knowledge.
Start with Canva (affiliate link) as a stepping stone before moving on to more advanced editing software such as Photoshop and Illustrator.
In addition, you will be able to use those Canva skills and knowledge to work as a freelancer on many other freelancing platforms to make more money.
That’s it. It’s a wrap!
My sincere hope is that you will find this ultimate guide helpful and will encourage you to kick-start your very own Redbubble store as soon as possible.
If you have any additional tips, latest updates, parts that were missed, or maybe sharing your first successful sale, please let me know in the comment section below.
Thanks for reading, signing off now.
Cheers!~