
Last updated on 5th July, 2024 at 02:58 pm
Blogging is an incredible way to express your thoughts and feelings, create or find a community of like-minded people, and share information. It’s also one of the most popular ways to make money online. In this guide, I will show you how to start a blog with Namecheap.
I will walk you through everything from picking the domain name to installing WordPress.
Heads Up: This post may contain affiliate links. Please read our disclosure policy for more information.
Now, before I explain the step-by-step, let’s have a look at the following topics.
- Can I really make money with a blog?
- Why I started a blog as an affiliate?
- Why you must start your own blog today?
- What to consider before starting a blog?
Just in case if you are here just for the step-by-step guide, you can scroll down to the section “Step-By-Step How To Start A Blog With Namecheap.”
Can I really make money with a blog?
Now, honestly speaking, it sounds way too easy as it sounds.
However, it is very possible to generate a nice amount of money thru blogging without prior experience.
And, you’d want to take it slow and steady as long as it keeps on generating you money.
I personally went thru the beginner phase (with ZERO experience) but eventually, I successfully make a decent amount of money per month with this blog! How’s that for a start?
So long story short, to answer your question, YES, you really can make money with a blog.
Why I started a blog as an affiliate
During my early days as an affiliate, I’ve tried a lot of methods on how to promote all the affiliate links.
I’ve learned how to promote the link without even having a website. Try this, try that.
However, I gained nothing in the end. My spirit descended like a ball slowly tumbling off a high building (in slow motion effect).
It was until this one fine day, I stumbled across a few articles from Google and Pinterest (can’t remember which article) where the author explained in detail what you can do more as an affiliate by having your own blog.
By having your own blog, you can freely insert your affiliate link rather than pasting the link in Forums (you can easily be banned by simply pasting the URL).
It comes to the point that I got fed up searching all those forums and decided to start my own blog after taking consideration from that article I mentioned earlier.
I wish I have started this blog sooner rather than wasting my time searching for other websites/forums, etc. Trust me; you’ll get what I mean once you started your own blog.
So, what are you waiting for?
Click here to start your engine now buddy!
Some of you guys must be thinking, “Hey, Wix offers a free version! Why would I waste my money to pay for Namecheap?”
Read this properly. Do not start blogging using a free platform! Why?
Because they simply look bad, limited capabilities, have low monetization potential, and you can lose everything (If the hosting company feels you are violating the terms of service agreement, they can simply delete your site with no warning).
Wouldn’t that be sad? All your time/energy that you invested to write your entire blog articles are gone with the wind?
Why you must start your own blog today?
Now, if you would like to make money even while you are still sleeping, blogging is one of the ways to do so.
You create content all night long by putting extra effort, and early in the morning when you wake up, “ka-ching”!
You’ve made yourself a few dollars just by one posting (affiliate). How’s that for a living? Not too bad right?
It would certainly help you to pay off some debts, house loans, car loans, bills, etc.
Related Topic: How to make money with Affiliate marketing for beginners
What to consider before starting a blog?
Choose your niche
These are the most important steps before you start your own blog. You may have to ask yourself the following:
- Is there any topics or things that you love to talk about with your family and friends that you can’t stop talking about it.
- What are your strength, interest and skills?
- What motivates you to grow and learn that skills?
Nowadays, there are a lot of niches that you can select such as
- How to make money
- Travel
- Beauty
- Healthy food
- Finance
- Relationship
- Technology
- Gadget reviews
- Fitness
- Weight loss
- Crafts and DIY
- Real estate
- Fashion
BONUS: Don’t you want to know the TOP NICHES? Of course, you do! Basically, the top three niches are how to make money, weight loss (diet), and relationship (how to save a marriage, how to prevent divorce, how to get back your ex).
There you go! So it’s your turn to decide which niche you would like to go for.
Choosing domain name
So, you have decided on the niche. Now it’s time for you to decide on your domain name.
What is a domain name? It’s basically your www.yourblogname.com. Yes, this was my hardest part to decide.
Because from the name of your domain, people would get a rough idea of what is all your blogs about.
Tips for choosing a domain name:
- Easy to type
- Keep it short
- Use keywords
- Target your area
- Easy to pronounce
- Check if it’s not trademark yet
- Use domain name generator
Anyway, give yourself time to properly decide your domain name. But don’t let it drag you way too long just to decide a name.
Now, let’s start with the step-by-step on how to start a blog!
Step-By-Step How To Start A Blog With Namecheap.
Step 1: Purchase Stellar Plan and Domain
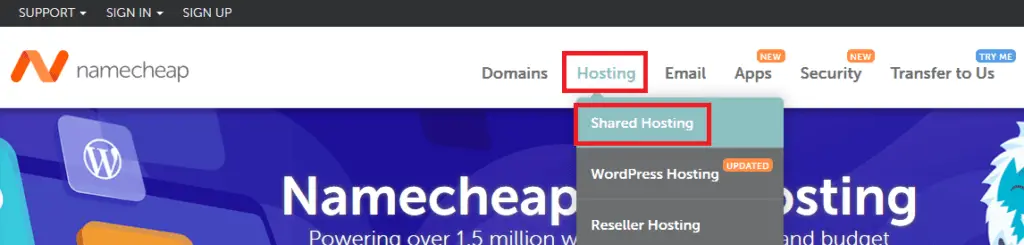
To get started, click the Hosting >> Shared Hosting right after you navigate to my Namecheap discount page here.
Then, select Yearly plan and select Stellar Plus (Popular) package as per the screenshot below.
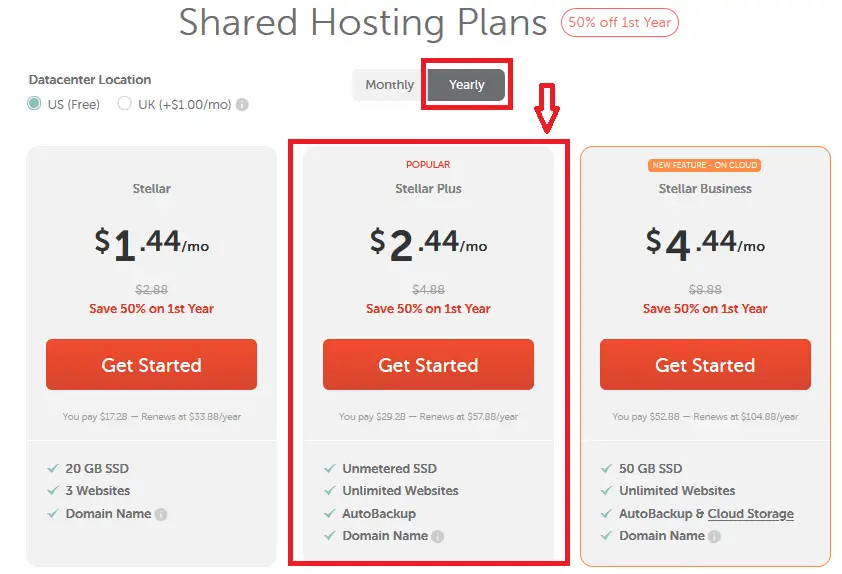
For a bargain, I fully recommend you guys to select the Yearly plan and the “Stellar Plus” (Popular).
Honestly, I personally purchased this package during my early days of blogging.
As you can see, it’ll only cost you $2.44 per month through this special link here (save 50% on 1st year) when you sign up for the Yearly plan.
The next option that is available in the “Stellar” plan, which is $1.44 per month.
And the last option is the “Stellar Business” plan. If you plan to select this option, the price becomes $4.44 per month (which is still considered cheap!)
What a great way to start blogging.
But again, the best bargain would definitely be the Stellar Plus plan simply because this lowers the rate compared to other options.
Just a piece of advice, you just need to select the “Stellar Plus” package and just ignore the “Stellar” and the “Stellar Business” package.
Why pay more when the “Stellar Plus” package is pretty good enough to start blogging?
But just in case somewhere near future you might want to change, worry not. You still can change the plan easily.
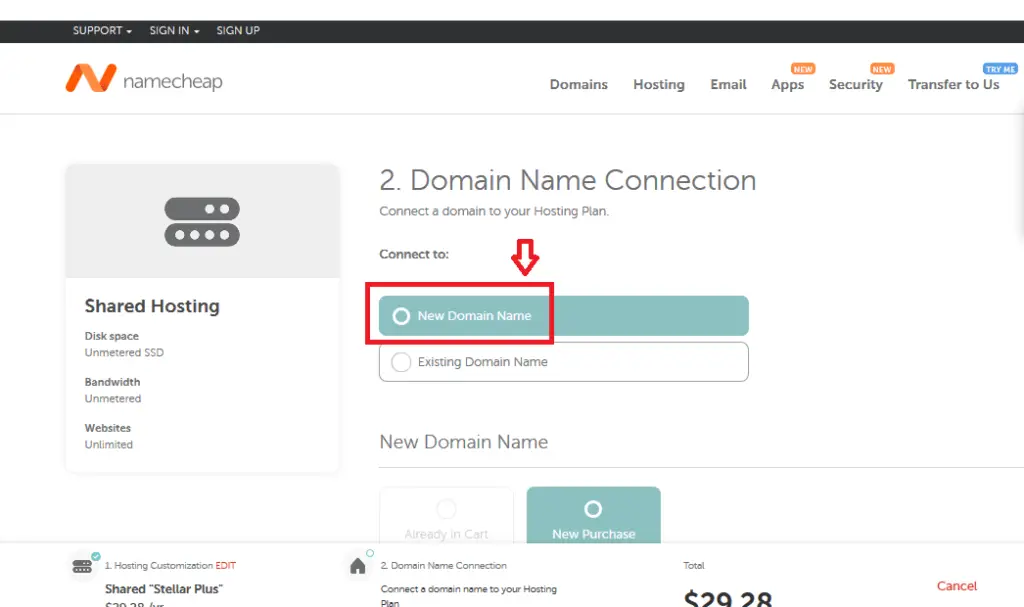
Step 2: Setup your domain name
Move on to the next step. You need to register your domain name.
Again, it is best for you to go with the “Stellar Plus” plan (best value) simply because it’s going to save your money in the long run.
Are you ready to register your domain name? Refer to the screenshot below.
On the “Find a domain name” field, type your desired domain name as shown on the example below.

If your desired domain name is available, you may just select the domain name and click the “Connect To Hosting” blue button below.
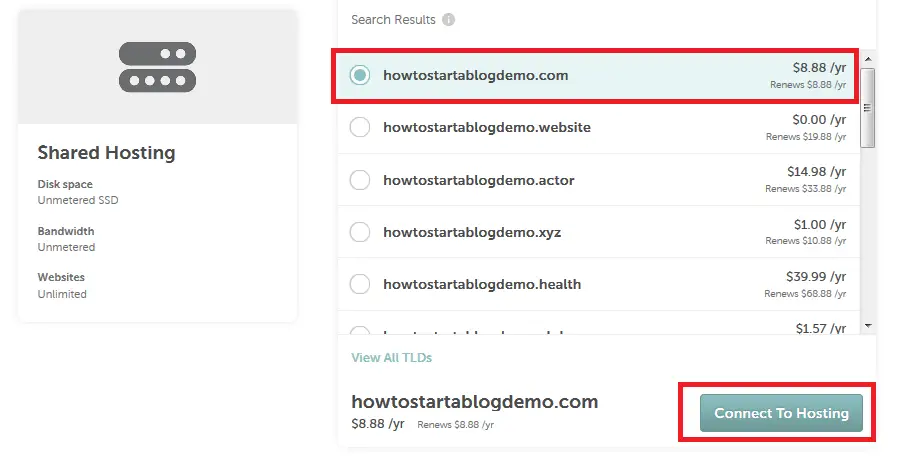
Then you may click the “Add to Cart” button as below.

Step 3: Domain registration, fill up contact and payment details
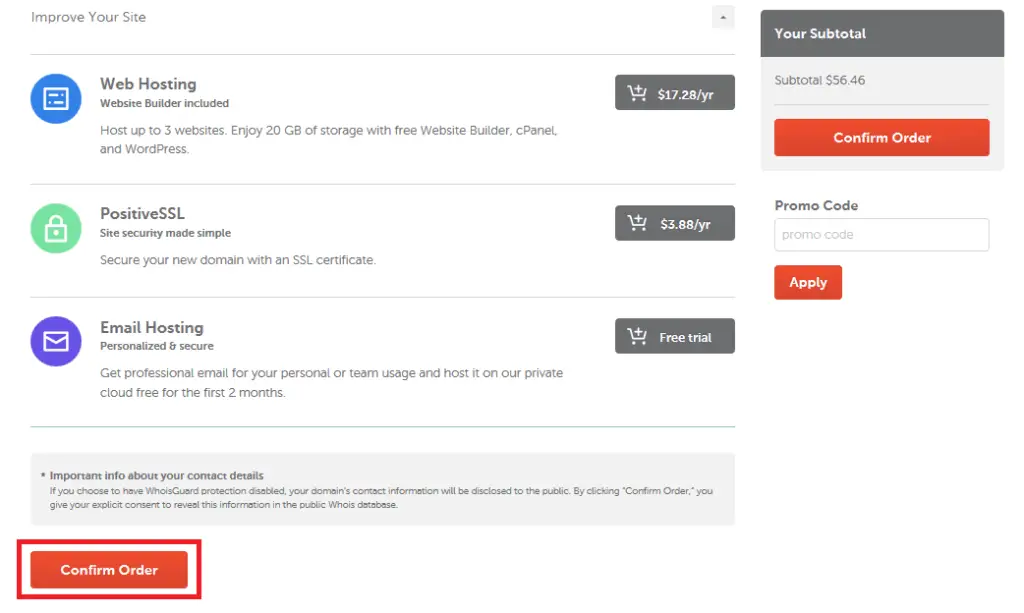
As for Domain Registration, you may select the duration for this registration, and don’t forget to enable the “WhoisGuard” option as below (FREE FOREVER).

You may just ignore the following options (Improve your site) and click “Confirm Order”.
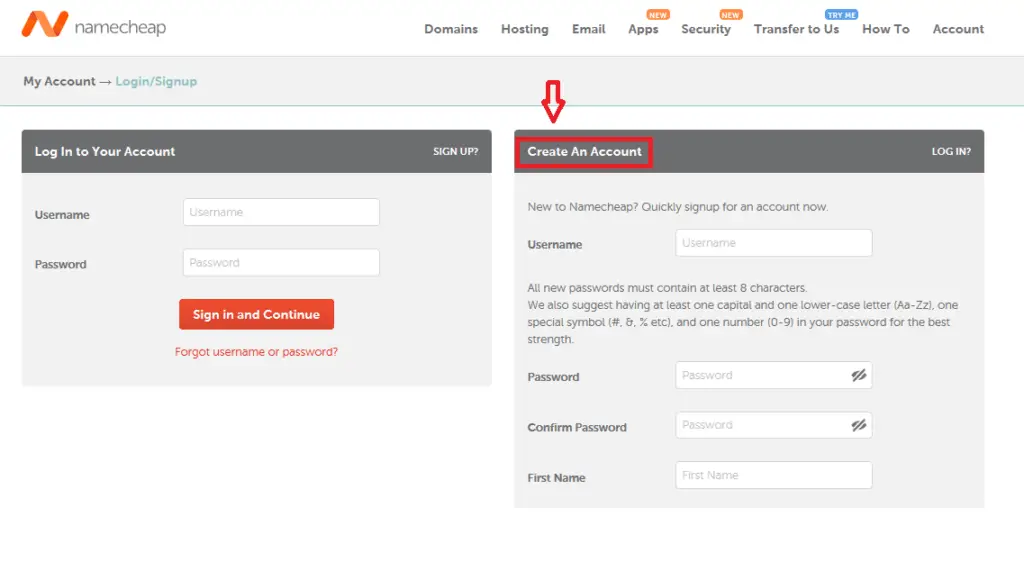
Step 4: Create an Account
Next step, you need to create your own account for you to proceed. Just my 2 cents advice, please do not use your banking or any other private information as your password.
You may need to create a strong password for safety precautions.
As you may know, strong passwords make it significantly more difficult for hackers to crack and break into systems. What is a strong password?
Well, a strong password is considered over 8 characters in length and comprised of letters, numbers and symbols. They contain letters in both uppercase and lowercase.
Now you can move on to the next step which is the payment details.
It’s a pretty straightforward form and you can fill it up accordingly.
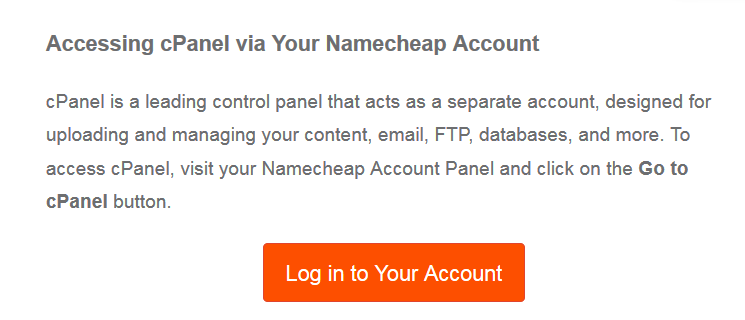
Step 5: Login to your cPanel and Install WordPress on Namecheap
So you’re almost done, buddy! When you have obtained the “Stellar Plus” program and your new domain, you will receive an email containing the login credentials for your host login credentials.
The relevant information about these is the username of cPanel and the password of cPanel.
Once you have taken note of your username for cPanel and password for cPanel. You need to go to your login page on cPanel.
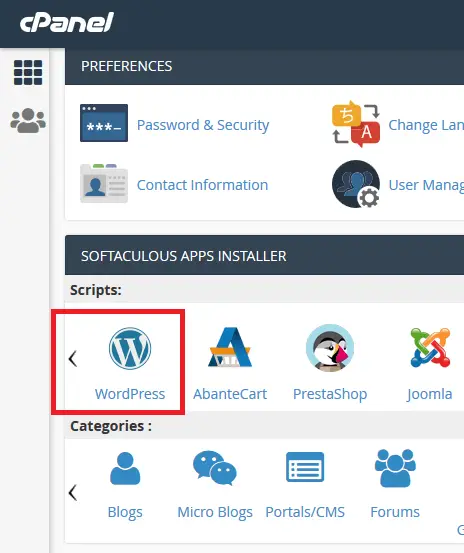
Now you need to install WordPress for free on cPanel.
After you have finished installing WordPress, now comes the fun part! Namecheap will ask you to select a theme for your blog. You may choose any theme that suits your style and preferences.
I’ve come across somewhere on the internet where people are saying that you’re not going to make money if you choose the free theme.
Well, in my eyes, as long as your theme looks clean, professional, and presentable, you are good to go, buddy!
But I’m not denying that a good theme will earn you even more money because of the feels and look that made the visitor feels confident and trust.
And remember, the content of your blog plays a big role too!
But worry not; you can still change your theme in the future should you wish to upgrade with the paid themes.
Step 6: Start building!
Embrace yourself, buddy! You’re on the final steps to owning a blog. Aren’t you excited? I bet you do.
Now that you have selected your theme and WordPress installed, you may click the Administrative URL below.
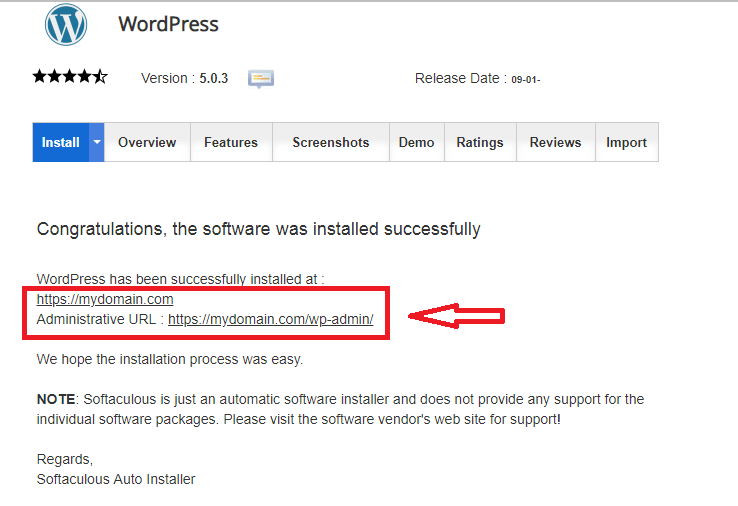
Done! It’s done! Congratulations! You just own yourself a blog!

So now you may start planning on what content you may want to share with your audience.
In terms of building your blog, I believe that they are tonnes of videos and articles on how to build a website with WordPress.
Ok, guys. That’ pretty much of it. I just want to wish you guy’s good luck!
Be patient and don’t give up along your journey to be a blogger.
Do you find this tutorial easy to follow? Don’t forget to share this page with your friends or you may save it to Pinterest!